Here is your essentials guide on How Do You Start A Blog the best way. This important article is a part of the “Blog Planning” category and is always being updated and enhanced. And, it includes implementation stages step-by-step. So, share it, save it, and return to it.
Overview of How Do You Start A Blog
This article of “How Do You Start A Blog” is actively maintained, updated, and expanded. So, you can revisit to ensure you’re using the latest guidelines. Also, it covers the action phases of creating the site and complete set up as well. Finally, it concludes with references regarding managing your blog, training, and miscellaneous items.
This is a startup blog guide that’s actively maintained so, keep reading for the latest and save this article’s link for periodic updates. The specific topic of how to start a blog is vast and complex. So, know that blogging is one of the top endeavors on the Internet. Some will write articles to share their interest. And some will write for income. Still others, do both. Regardless, this entire site is for all who fall under any of the following:
- You are a high achiever
- There is knowledge you have to share
- An enjoyment or passion exists in your sharing of information
- For those who are income oriented
- aren’t falling for the get rich quick schemes in under 12 months
- are willing to do the hard and often tedious work
- have a different income stream that won’t rely on this one for some time
Part 1. How do you Start A Blog? Start Here Now.
We begin here on how do you start a blog. This is done effectively in phases. Begin by planning it as a project. And, your project goal is to learn how to start a blog, plan it, create it, and set it up. Your project is completed after it’s created and set up. After that, you manage it for effectiveness and growth.
Any successful venture creates a project with a goal in mind.. Parts of your plan should cover defining lists of both quantitative and qualitative goals and tasks. Some of those tasks include determining your niche, defining a budget, learning a whole lot of things, and so on. We’ll address some of them now so, keep reading.
Phase 1. How Do You Start A Blog Startup Plan?
This phase responds to how do you start a blog startup plan. To start, just list your goals in a Bog Startup Plan. And, as you learn more, you’ll change your goals which is perfectly normal. You might be doing this for personal reasons and not as a business. Regardless, many still refer it as a “Blog Business Startup Plan” or at least as a “Blog Project Startup Plan”. Note that the “Business Startup Plan” is different than a “Business Plan”, as it’s primary focus is on getting the business started.
Start With Creating 2 Lists
So, before any project is officially begun, one of the earliest steps is to create a Mission Statement and a Project Charter. They are simply 2 lists of things to achieve.
How Do You Start A Blog Mission Statement?
How do you start a blog Mission Statement and show your goals? Well, the Mission Statement lists your long term goals overall. A Mission Statement continues for the life of the blog. Here are some generic optional examples of some things that might appear on your blog’s mission statement:
- State your blog’s niche.
- Briefly describe your market target, i.e., the type of readers you’re focusing to reach.
- If for income, you might describe how you’ll balance quality content with low invasive ads.
- Include a note of ethics or quality employed.
How Do You Start A Blog Project Charter?
How do you start a blog Project Charter and merge it into your list of goals and activities? Well, the Project Charter is a declaration statement. And, it lists short-term activities that occur only during the life of the project. So, that’s how it’s done. On a side note, a Project Charter will end when the blog is up and running and that’s also when the project itself ends.
The Charter must be very clear, reasonably specific, but still present summarized actions that will take place. It defines a mention of handling any necessary adjustments when encountering new discoveries. The Charter also illustrates responsible parties for some activities to reduce conflicts. Also, it will illustrate time durations and intended results to achieve.
Regarding Charter defined results verbiage, they can be as simple as “create”, “design”, and so on. In some cases, it might be a result of completing 3 posts or 80% of design goals. Here is a small partial list of generic optional examples of some things that might appear on your blog’s project charter. It includes 2 people, Janice & Ken performing the work.
Example Start of a Blog Charter
- Define a blog niche: 1/2 day, starts Jan. 4th, by Janice
- Review legal requirements and obtain training as needed: 2 weeks initial, 1 week during project, starts Jan. 4th, by Ken
- Create an initial budget plan to include the initial startup year vs recurring years: 1 day, starts Jan 5th, by Janice
- Prepare a project startup plan or a business startup plan: 1.5 days, starts Jan 5th, by Janice & Ken
- Buy or design a logo: 1.5 days, starts Jan 8th, by Janice
- Research & acquire services (not set up) to host blog website & related items (domain name registrar, DNS, cache service, CDN, etc.): 2 days, starts Jan 12th, by Ken
- Create website and finalize basic set up (no content beyond blank home page & default privacy policy): 2 days, starts Feb 2nd, by Ken
- Set up website theme initial design: 1.5 days, starts after website basic set up is done, by Janice
You can also make the Charter in a spreadsheet fashion instead of as a bulleted list. Or, create it as a table or chart. Some have made Gantt charts to further visualize its chronological intent. With home blogging, with just 1 or 2 people, it’s a much simpler task to create a simple list. It’s important to have a Charter as a focused guide to stay on track.
Skipping The Project Charter and Mission Statement
With a home blog and quick, fast goals to accelerate, you can skip the focused administrative aspect of a project charter and mission statement. If it’s just one main person or 2 people where 1 does most of the executing, there is a more efficient method. In this case, just list your goals and tasks altogether. So, let’s start building that instead.
An example primary goal such as “I want to build a successful blog online and make lots of money” isn’t anywhere feasible because it doesn’t convey specifics. Also, it doesn’t focus on getting things started.
The terms “successful” and “lots” are open to interpretation and therefore, must be spelled out better. Here’s another rewritten example of that primary goal to be “I want to build a blog online that shows over 80% of comments being favorable and profits of $85,000 annually”. The idea is to add some quantitative metrics mixed in with the qualitative goals.
Example Simple Project Goals & Tasks List
Here is an example of some goals and tasks to show in a simple project list. So, start with a rough draft and, during the initial “data requirements gathering”, you make major changes until you’re ready to implement. After you start implementing this project list, you change it as you learn additional things. Project professionals call it “making discoveries”, instead of saying “oh, I didn’t know about that”. Lol.
- Decide my niche.
- Determine business licensing and legal requirements (local, county, state, federal).
- Establish a budget with variance allowances to include startup costs and recurring expenditures.
- Decide on financial tolerances of low or no income stream from site for first 2-3 years.
- Determine home area & technical requirements including equipment, services, apps, & outside contracting.
- Decide on extent of media usage (photography, videos, graphics).
- Prepare site design preferences (desktop & mobile).
- Make a marketing vision to include branding like logo & theme colors.
- Prepare a list of training needs.
Phase 2. How Do You Start A Blog In Your Niche?
Determine your niche first, and then you can focus on how do you start a blog in it. You’ll need to get your niche to a refined level that your blog will be about. Make it specific now. It will be easier for conveying Topical Authority (very important long-term).
As an example, your niche might be “Honda Motorcycle Maintenance”, instead of just “How to fix Motorcycles”. The term “Honda” makes it more specific. And then, your site categories and articles will get into the more detailed aspects of that.
For more detailed ideas, read our example food niche article on “How to Refine Your Food Niche Ideas“. It includes a specific set of methods revolving around the food blog niche.
Phase 3. How Do You Start A Blog Budget Plan?
How do you start a blog and its budget plan? At this phase of your blog project plan, you’re ready to define a budget. Starting a spreadsheet on expenses will be very helpful. In my case, I created a separate tab (aka “Worksheet”) for my site expenses.
Another benefit of having a blog budget is you’ll see the difference between your startup costs compared to future annual (or monthly) recurring costs. Also, you can review it over time to consolidate older services into newer available services. That scenario has the potential to save you work tasks, overall costs, or both.
See our article “How Much Does A Blog Cost?” It gives good examples of a Blog Budget Plan and actual expense examples.
Phase 4. Review Legal Requirements: Business or Personal
In creating a blog, whether you monetize it or not, you’ll want to ensure you have all the business and legal requirements satisfied. You might want it for personal values and with no monetary gains in your list of goals. Or, you might want it as a personal site and have monetization as a goal but, not as a business. So, you might want to confide in legal guidance from law resources so you’ll have the necessary requirements met and in place.
If setting it up as a business, you’ll want to prepare to have all the legal documentation in place eventually. It’s easier if this is done after you’ve secured a domain name but it doesn’t have to be. At some point, you will have enough of the business legal requirements met and you can create the blog site.
The “dba name” or “Legal Name”
Every locale in the country is different. So, the legal and licensing requirements often differ across federal, state, county (or parish or other), city (or township, etc.), and even down to level of a community, neighborhood, reservation, or HOA.
Be aware that the legal name compared to the site domain name don’t need to match anywhere at all near each other. You might want to acquire a “dba name”, i.e., a Doing Business As name. The government level that can do this will vary across the states, counties, and cities. In my case, the state and the city does not handle this. But, the county does. Again, this will might require research on your part. In my case, all levels and legal entities were saying the state makes the DBA. After much research, I found it was not and the county did it but only at a particular sub-office.
The BOIR: Business Ownership Information Report
The Business Ownership Information Report is sometimes required for businesses. So, start with reading over “Is BOI Filing Still Required?” If you’re required, then check out how you can file your own BOIR, including all the links and step-by-step guide. Finally, if you need to make a change later, see the post on “How to File Updated BOI Report Online“.
While waiting for many of the business aspects to happen, you can begin setting up some changes to the area you’ve selected in your home.
Phase 5. How Do You Start A Blog Office Setup In Your Home?
You’ll want to consider making some changes to your home to accommodate a home office or work area. And then, there are the requirements to add to your office, depending on your situation of furniture and technology equipment and services.
Also, we are writing posts for some office setup and office technology items. Here are some of them.
How Do You Start A Blog With Tax Write-offs? Always a Good Idea?
Typically, you might want to write off office furniture and equipment from taxes. After my research, I will have federal, state, and county taxes. In further due diligence, I discovered that the county charges a 10% tax of some business assets that are purchased and written off. So, in other words, if I bought a $500 chair for the business, I am taxed $50 per year after that. And, in some cases, it’s 10% per year forever. Yep, not just for 10 years. So, a write-off isn’t always a write-off, in my scenario anyway. So, I wrote off nothing and the business has no assets tied to it.
Important TIP: Look into the details of your local county and city taxation filing details.
You’re now ready to get your website services so you can plan, design, and create your blog website. After that you’ll be writing and publishing content. Finally, you’ll be managing and maintaining your blog site.
Part 2. How Do You Start A Blog Website?
This is the starting point of deciding on your blog’s site infrastructure. Like everything else, it will vary widely across everyone’s list of goals. So, the best approach is to give you an example of a potential working model for a site. It’s a very long list but the good thing is, this is for getting you started and you only have to maintain it after deployment.
Phase 6. How Do You Start A Blog Plan of Services and Get Them?
Get Your Domain Name & Site Hosting Service Plan
Determine what service you will use to host your upcoming blog website. Then, purchase the domain name from them. When your Domain Name and Hosting Services are on the same source, a lot of the work is significantly easier.
- First, purchase your domain name from this Web Host, HostArmada.
- Next, select a hosting service plan with these below features such as these found at Host Armada. Or, start with a lesser plan at Host Armada and upgrade later.
- minimum use VPS
- unshared
- managed
- option to have multiple domains on the same plan (some only allow 1 domain per plan)
- If you are planning on a recipe blog, e-commerce (shopping from your site), or other heavy “lookups”, you’ll want at least 2 CPU cores.
- large enough site storage such as 50-100 GB in space. That’s to allow multiple backups to co-exist also.
- For a more complete list, look at our Blog Technical Resources article for recommendations.
- Then, assign the purchased domain name to use the website hosting plan you chose. Or, if with HostArmada, you can do a live chat and they will do that for you.
- If you have a hosted plan already using another domain, you can choose to include an addon domain in cPanel to that same hosting plan. I had this scenario so, to make it all integrated, I moved it over to Host Armada and dropped the previous host. Now, I have several domains running on one Host Armada plan.
You’re now ready for creating your blog website. So, keep reading to see the step-by-step guidance on this. Now, you’ve completed the planning phases! You’re ready on how to set up your blog’s website, configure it, and change some design settings.
Phase 7. How Do You Start A Blog Website & Optimize It?
You’re now ready to create your blog’s website, to set it up, and then to optimize it. Let’s proceed.
How Do You Start A Blog Website Main Structure Plan?
Below are the minimums that sites generally have at the starting development phase. You’ll want to be aware of these and consider some planning in advance about each.
- Pages: home page, contact us, about us, sitemap page, privacy policy, and 1 page for each category
- Structure: categories, tags, permalinks, menus (primary & footer)
- Posts: initial published items will be about at least 3 posts for each category.
Create and Set up Your Website
- Web Server CMS (content management system): WordPress (full). See our articles:
- Complete this WordPress Installation by following this illustrated step-by-step installation guide: How To Install WordPress.
- Then, finish WordPress by configuring it and setting it up. Just follow this heavily illustrated step-by-step set of instructions: “WordPress Setup: Beginner Complete Tutorial“.
On a side note, Mark Brinker wrote a masterful article “Parts of a Website: A Cheat Sheet for Non-Techies“. He goes into showing all the parts of a website. He lists a short description explaining each piece. Also, he shows the technical aspects, the pages to include, and references to design and layout. There’s a lot more than that but it conveys an overall summary of a lot of what’s recommended to have. It’s intended for non-tech beginners and is a healthy reminder for intermediates and advanced people. I loved his explanations of each part as they were easy to understand the more complex pieces. It’s good so you can see 2 perspectives of similar tasks to accomplish.
Finalize Your Website with Suggested Extras
Here is a list of some suggested items for either apps or plugins. Apps might be stand-alone for your computer desktop installation. Plugins are utility apps that are installed directly to your website.
- Apps: self auditing software
- Plugins to consider having
- redis object cache (with Redis service enabled thru web host like Host Armada)
- theme: additions: Kadence Pro, Kadence Blocks Pro
- Zippy
- Code Snippets Pro
- Content Views Pro (for professional grid layouts)
- LiteSpeed Cache if you have LiteSpeed Server enabled through your host (like Host Armada has)
- If not using LiteSpeed Server then, use FlyingPress plugin. It’s a very well respected professional caching system, recognized by the Pros.
- WPVivid (for backups)
- AIOSEO (All In One SEO)
- For recipe blogs only: WP Recipe Maker Premium, the world’s number 1 plugin with all features.
- Later on, when you have over 10,000 pages traffic per month, add “Ad Inserter Pro” (for advertising revenues and monetization)
Design a Site Logo
The importance here is to choose a logo you have full unlimited rights to. You can create your own or purchase your own. Also, you can combine some purchased artwork into your own design. Here’s an example of DarnGoodRecipes.com logo.
One ideas is that you can buy a basic vector or high quality image. Then, add a background of your own, a unique border, or some other enhancement. For example, one such enhancement is to add your site name or site motto onto the logo, or next to it. One good example is finding image(s) that you want and paying for the higher rights to them. I did this using VectorStock. You can start out with some free images and them upgrade licensing usage where possible. See below for an example.
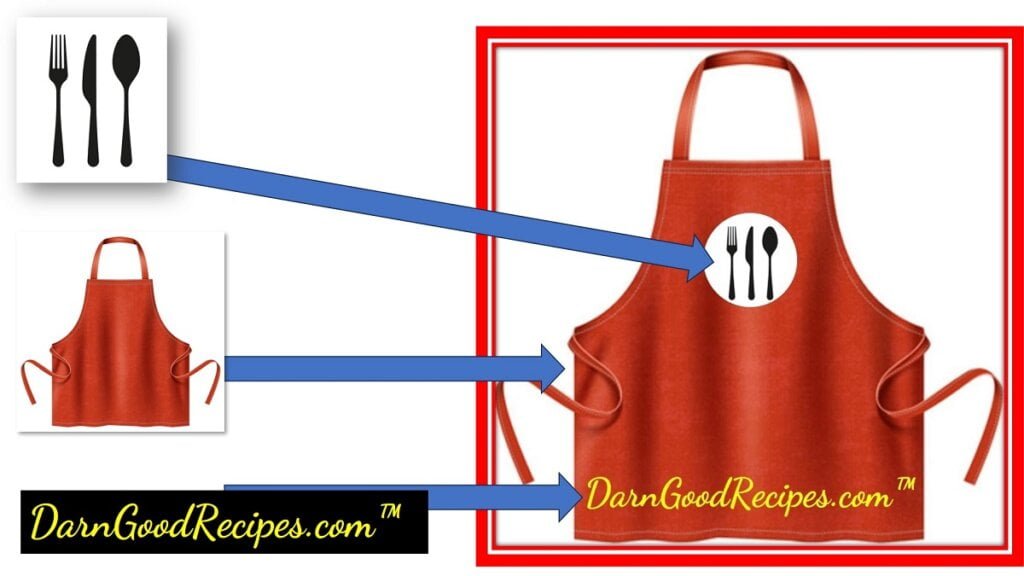
Also, you’ll want to create your logo in multiple layout dimensions. You’ll need one as a square image and as a wide, horizontal rectangular banner image as well. So, the use of your logo will vary a little. To have a banner image, you can consider using your logo on the left or rights side and then have your motto spelled out across the rest of the banner.
Phase 8. About Media To Use
Media for your blog will require using images as a minimum. More media options are:
- photos
- tables
- charts
- slides
- screen captures
- videos
- audio
There are some sites that don’t include videos or audio so this is perfectly normal to not have any. Also, if using stock media, ensure you are licensed properly for their usage. It’s much better if you use your own images.
Creating your own images, even with a typical phone, are perfectly fine. The resolution of current phones are generally considered very good. Photography blogs, however, are an example of niches that will require your own specialized equipment for high resolution output.
You’ll want to learn proper image sizing to use. There are many different requirements for publishing images you’ve made. They are dependent of what they’re used for on your site such as in the middle of a post, as the featured image of a post, and as a recipe instructional step image. Also, if you post to social media, they each have their own preference of what size to use.
Here’s a couple of good guides to assist on starting image sizes when you edit photos you’ve taken or have.
- Best Size for WordPress Images
- WordPress Blog Image Sizes Quick Chart, a good quick reference guide
Part 3. Write Quality Content and Apply SEO
After everything’s in place, you’re ready to create your first quality content blog post. If your site will have food recipes, read our article on an example of “How to Format a Blog Post Recipe“. It will be helpful in getting started. Over time, you’ll make your own formatted layout.
Today’s content on blogs however, are not just a random collection of articles. The emphasis is on building topical authority by clustering topics into groups. This is to identify the more outstanding sites as have more complete coverage of an entire topic. Read more on this in our article “Topic Clusters Examples“.
Applying SEO When Writing Blog Post’s Content
There is a lot of misinformation on starting and maintaining a blog along with its SEO. You will need to gradually define and work with your own methods of SEO best practices. Kyle Roof is one of the most trusted SEO experts. And everything is based on the difference of what Google says versus real world actual results.
It’s important to be aware of opposing guideline opinions and choose carefully which ones you’ll lean towards. There are many valid SEO experts and they achieved success by using a collection of ways. So, because one or two particular methods worked for them, many assume those were the correct methods everyone should use. In fact, it just technically means that those one or two methods worked great for them in their grouping of all methods being used. Here is an example.
There is an highly successful person well known for being an expert on optimizing link building on sites. He also recommends that “categories” should never be indexed. However, many experts of SEO will say it depends if you should index your categories or not. And the largest majority of SEO experts say that you should index your categories. However, the expert on link building does a much better job of building internal and external links.
So, in this case, perhaps he would be even better if he indexed his categories and built up the categories’ content. Imagine what would happen to your site if you chose to not index categories and neglected to also work on other factors of that same expert.
Part 4. Manage The Blog and Site
Managing your blog involves many facets. You’ll be monetizing the blog, managing reader comments, updating content, keeping up with SEO changes, resolving technical issues, reviewing analysis and self-audit reports. Also, you’ll be researching and creating new content, making new tags or categories, changing site design, making site menu changes, writing communications for backlinks, posting to social media, and much more.
Related To Managing the Blog and SEO
Part 5. Training Suggestions & Miscellaneous
Here are some of the key topics that nearly everyone should get some training, even if it’s reading searched articles on the topics.
- How To Use WordPress
- SEO
- EEAT
- Blogging Terms (this is acquired during learning each topic)
- Marketing: Brand Building, Social Sharing
- Monetization (after traffic builds up): plugins, affiliates, ads revenue
- Acquiring Backlinks correctly without buying or using a backlinks service
Conclusion
This guide has given you an overall insight into answering how do you start a blog. It’s quite a lot but, that’s just to get started. The good thing is, after it’s all created and set up, you don’t have to do those startup phases again. Let me know if you started a blog and where it is (URL) in your comment. You link to mine and I’ll link to yours (except offensive or SPAM sites, of course)! You just have to share with all of us your results of what things you did and how this site helped you! Leave a comment now; I read them all.

59 comments
Gail
Everything is very open with a clear description of the challenges.
It was really informative. Your website is extremely helpful.
Many thanks for sharing!
Oren
Usually I do not learn article on blogs, but I wish to say that this
write-up very pressured me to check out and do it!
Your writing style has been surprised me. Thanks, very nice post.
Jerold
Aw, this was an exceptionally nice post. Finding the time and
actual effort to generate a good article… but what can I say… I put things off a lot and don’t manage to get nearly anything done.
Kenton
The article is smart, accessible and valuable. Your site
continues to stand out positively.
Angus
Normally I do not learn post on blogs, however I would like to say that this write-up very forced me to check out and do it! Your writing taste has been amazed me. Thank you, very
great article.