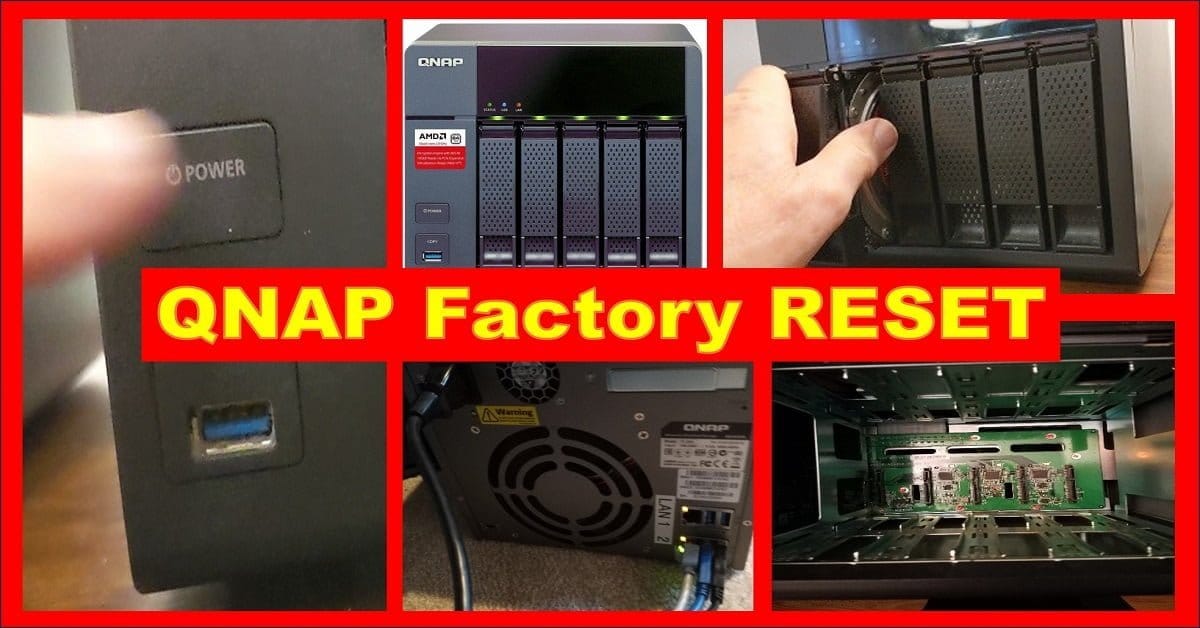
This guide is a complete step-by-step guide of how to perform a complete QNAP Factory Reset and re-initialization of a QNAP NAS. This example is good for QTS version 4.x QNAP®NAS but also can be for QTS v5.x. Screens and models may vary. This typically will help you ensure improved performance so, keep reading. Also, this is one of our many miscellaneous training articles.
Why Do A QNAP Factory Reset? For Speed & Fix Issues!
When you need a fresh start, there’s a systematic way to perform a QNAP factory reset or re-initialization. This article shows an example of how that’s done. It often resolves lingering issues that have been building over time, if you’ve performed a lot of changes over the months or years.
After a year or two, I needed to fix some issues, and I really needed to improve its performance. I tinkered with many apps, settings, and storage, and noticed problems. It was time for a complete refresh. I’ve performed a re-initialization several times over the years and I took notes, as I noticed it was far more productive and safer if I did things in a certain order. Here’s the sequential order of the steps I took as an example for you. I hope it helps.
The Different Types of QNAP NAS Resetting
QNAP has about 5 different shown ways of resetting their NAS. Some of them keep the data and some of them remove everything including data contents. My guide covers a method not shown on that list. It is the most raw method and it erases all data contents as well as resets the QNAP NAS Settings to the Factory Default (of your current QTS firmware version).
So, if you want to just perform a type of reset that retains your data, here is QNAP’s article named “The different ways of resetting your NAS – explained!“. However, be aware that some of the shown resets might keep your files but the permissions and shares will be deleted.
Again, my method in this guide is not shown in that QNAP article. And this guide will fully erase all data including a factory resetting of its settings to their defaults.
QNAP Factory Reset & Reinitialize NAS Overview of Steps
Hopefully, it will assist anyone, in full or in part, in planning or for proceeding. Implementing a QNAP factory reset is a long, tedious process. Different versions, models, power surges, etc. may cause varied experiences.. This guide covers a basic reset of the NAS. So, it’s your responsibility to ensure you have a full a separate external backup of everything currently on your NAS. This reset will erase everything from the NAS.
Example Device Specs Listing
- QNAP® NAS Model TS-563, AMD 2.0 GHz
- Used for Backups off of NAS: External USB Hard Drive in a dual hard drive Dock
- Windows 10 Laptop on the same LAN (used for the browser to access the NAS for setup and configurations)
- Count of Drive Bays: 5
- RAM: 16Gb, DDR3
- HDD: WD Reds, 6 Gb/s (SATA3)
- 2 NICs (using 1 NIC in this guide)

Backup Before the Complete QNAP Factory Reset
- Ensure all data (files, databases, users, systems, virtual images, etc.) were backed up from the NAS. That means backed up on something reliable besides the NAS. Also, you must be able to use it for restoring to the NAS, since it’s about to be an emptied NAS! Personally, I make 2 backups to be sure.
- To prevent the deletion of files and folders, pause any syncing on all clients until it fully restored the NAS files. I have experienced the client deleting files and folders if someone did not fully restore yet the NAS files. I’ve also experienced a QSync (QNAP Syncing) issue a couple of times so, I no longer rely on it due to many options changing.
- Also, perform a backup of your NAS “Settings” and save them locally off the NAS.
- You MUST ensure you’ve backed up everything for later restoring to this NAS before proceeding. Also, make a backup of this NAS Settings. All backups must be on an external device or system, i.e., not on this NAS unit.
Start The QNAP Factory Reset & Erase All Data
- Start the QNAP Factory Reset using this method:
- Shutdown the NAS. Leave it plugged into power and connected to the Internet (e.g., via the router). This guide is based on you using a computer that’s on the same network as the NAS.
- Next, remove/Eject the hard drives. If you’re NOT performing a complete reset of this system, you’ll need to mark each drive so you can later re-insert them in the exact order as before. Otherwise, the order doesn’t matter. This guide focuses on a complete reset to restore factory defaults and format all volumes.


- Then, startup the NAS, ensuring it has a network connection to the Internet. You can connect your Windows computer to the same network router via Wi-Fi for configuring and connecting to the NAS.
- Note: Your computer’s Wi-Fi or LAN connection must be such that your computer is visible to see other devices on your network. If using Wi-Fi, you can check/edit your Wi-Fi properties in Windows to ensure it’s showing as a “private” connection and not a “public” connection.

Start up the NAS.
- After about 3-5 minutes, you’ll potentially hear a double-beep.
- Then, insert the hard drives you want to use (minimum 4 drives for RAID 10). This example uses 5 hard drives (1 spare + 4 for RAID 10).
- You can now start the NAS setup or its re-initialization. Based on this guide, you will proceed to re-initialize.
- Using your computer that’s on the same network as your NAS, you can continue to follow these next steps.
Install Qfinder Pro App To Continue The QNAP Factory Reset & Reinitialization
- Install the Qfinder Pro app (using default settings). The app is on the QNAP.com site under Support | Utilities or directly here: (https://www.qnap.com/en-us/utilities/essentials). When started, respond to the prompt for your region, e.g., “Global”. Once selected, the system will search for your NAS’ IP address.
- Respond <Yes> when asked about the NAS Server to be initialized.
- To continue, click <Yes> to choose to start the Smart Installation Guide. You’re on your starting path to improving your NAS performance.
- It will use your default browser. It may prompt to check your warranty, which is an option. You can opt to close the screen by clicking the small ‘x’ in the upper right-hand corner of that pop-up message.
- Close the Qfinder Pro app and continue following just your browser screens.
- You will see the starting screen. It will show your QTS firmware version on the upper left and your model in the upper right.
- Finally, you can continue by clicking on the button “Start Smart Installation”.
Start Smart Installation
- Your next screen will offer a check for availability of a firmware version upgrade. You can opt to check for an update and follow that process to upgrade if desired; however, you’ll need to perform the hard drive removal process again by starting over with this guide. Also, I don’t recommend an upgrade until you’ve completed the reset and restore of files and a new full backup.
- This example presumes your version is current or that you won’t be upgrading it yet. So, click the button <Next>.
- The next screen portion shows the option to perform a complete initialization or just a reset to factory settings.
- This guide’s example is choosing to click <Initialize System> now, which will erase all data and files, and will format the drives.
- Note: If you chose to only ‘restore factory settings’ (to keep files), you will need to decide which of the upcoming steps and categories to ignore and skip because of that choice.
- Follow the next steps, which represent a variety of topics you’ll be experiencing to choose some settings for each.
Populate Settings to Use During the Initialization
NAME/PASSWORD Screen
- You can re-use previous or use new settings identifications and credentials.
- Assign a NAS Name, e.g., “Baygents”, and change the password now. Then, click <Next>. Note: the starting default login credentials are needed to continue. QNAP reports the following 2 default admin credentials.
- For QTS v4.4.1 and earlier, the default user is “admin” and the default password is “admin”.
- For QuTS or QTS v4.4.2 and later, the assumed default admin user name is “admin”. The default admin password is the FIRST listed “MAC Address” (in QFinderPro or on the sticker on the back of the NAS). However, as a password, it must be changed to be ALL CAPS and remove all the dashes (hyphens). So, it’s just numbers and capital letters.
- Update your own passwords list and consider to use “QNAP” and the NAS model number and its FIRST MAC Address in the naming or labeling for later easier resetting.
- Then click <Next>.
- Assign a NAS Name, e.g., “Baygents”, and change the password now. Then, click <Next>. Note: the starting default login credentials are needed to continue. QNAP reports the following 2 default admin credentials.
DATE/TIME Screen
Change the time zone and change the time server, as needed and preferred (I typically keep the default NTP server), and click <Next>.
NETWORK Screen
This example uses to choose the option “… DHCP…”. However, you can certainly opt to fill in the desired details of a static IP. Then, click <Next>.
SERVICES Screen
- Choose the minimum number of networking (sharing) options, e.g., Windows. This is important to help improve your NAS performance. This guide’s example uses the selection of “Windows”. Then, click <Next>.
- Then, you’ll arrive at a summary screen to review your recent set of choices. You can click individually on any individual item for a last change, as needed. When satisfied with your review of your choices, click <Apply>.
- Finally, there is a pop-up prompt as it’s preparing to erase your hard drives, as this guide’s example is a full initialized system. So, to continue to erase your drives and their contents, click <Initialize>.
The Initialization Process is Underway!
- The prompt will go away and applying your settings begins. In our example of five 3TB drives, it gets quickly to show a 99% progress bar for about 5 minutes. They display a list of individual services for about 10 minutes. So, when those processes have finished, you’ll see a “Congratulations” screen and you should click on <Go to NAS Management>.
- If you don’t see the “Congratulations” screen, close your browser and use the Qfinder Pro app to reconnect.
- Then, close your browser.
- If you need to, open the Qfinder Pro app to locate your NAS again (the IP address might have changed)..
- You may see a pop-up prompt asking if you want to set up SMTP now. So, you can choose <No>, knowing you can set that up later when you’re ready.
- Still within the Qfinder Pro app, observe the displayed IP address of the NAS you’re working on, ensure it’s selected (in case you have more than one in the list). Then, click the upper left ‘Login’ button.
- It will then open your default browser to your selected NAS IP address on the login page.
- Populate the password you established earlier. Then click to select the “Secure login” checkbox, and click to <Login>.
1st Login – Lots of Opened Screens Right Away
- After you login, you are at a visual desktop of the NAS. After this, with a single click, a lot of screens start popping up and it’s messy.
- They are features and functions of various aspects of the QTS system and multiple prompts to set them up. To reduce complexity and improve your NAS performance, choose all that you can to respond as “no”, “cancel”, or “later”, and so on. Then, close the browser.
2nd Login – Continue Setting Up NAS
- Using the Qfinder Pro app, click to logon to the NAS again and login. This time, your experience may be more orderly in the following sequences. The following goes through a list of different options based on your model and history that is tied to your NAS, e.g., past licenses.
- With the prompt regarding the aspect of the “Help Center”, click the small checkbox stating “Do not automatically launch Help Center.”, followed by clicking <Ok>. Then, close the “Help Center” screen, using the upper right “x” in its window.
- Also, with the prompt regarding to make you aware of licenses, you can again click the small checkbox to not show it again, followed by clicking <Close>.
- Next, with the prompt regarding “No Volumes and/or Storage Pools”, you can again click the small checkbox to not show it again, followed by clicking.
- This one will prepare you to define your desired storage setup. First, you click <Yes> to agree to the terms of the “Data Collection Agreement”.
- Next, you’ll see a training exposure set of slides of some functions, features, and usage regarding storage. You can go through them to review on the latest by clicking
several times, or click. - If you went through the slides, on the last ‘slide’, you’ll see ‘Finish’ and ‘New Storage Pool’. Click on <New Storage Pool>.
- If you skipped the slides, you end up seeing the “Storage & Snapshots” screen. Just click the icon’s ‘+’ plus sign, just above the “No Storage Pool” verbiage.
- Then, from this point forward, your NAS has been reset and you can now proceed to set it up to your preferences.
How To Reset the Admin Password of QNAP NAS
QNAP has postings regarding how to reset the admin passwords. There are at least two methods, based on QTS versions. See their article “How do I reset the administrator password of my NAS?”
Related Articles
A QNAP NAS is great for a home office setup. It continues to be the go to reliable home server and security camera surveillance system. It’s super for blogging, and with a RAID 10 setup, it’s very fast. For more details of a home office setup or of technologies, here are some related posts.
Conclusion of QNAP Factory Reset
In conclusion, this guide has shown you how to perform a QNAP Factory Reset using QTS version 4.x on an example model. And, I have used these steps to work through a QTS v5.x reset, only a little different. Also, it’s advised you to backup everything you have on the NAS as this procedure will erase everything. You’ve read how there are some preparations to complete before resetting. And you’ve seen how to perform the actual reset, followed by using a computer on the same network to locate the reset NAS, and to perform the initial login.
So, be sure you let me know how your reset went for you. Leave any comments to illustrate any differences or similarities with your model and QTS versions. I’ll incorporate it into this article for others. Also, although this article works good for v4.x, I’m working on a posting for QTS version 5.x currently and I’ll add the link to it here. So, return back for that update!

7 comments
Adriana
Hello There. I found your blog using msn. This is a really
well written article. I’ll make sure to bookmark it and come back to read more of your useful information. Thanks for the post.
I’ll definitely return.
Jeffrey Thomas Baygents
Thanks Adriana. Glad you enjoyed it. It was a post that took several resets to get it right over a few days. And it’s been very popular.
Marcus Lesniak
When I tried to start my QNAP TS-451+ with no hard disk connected, I was able to connect to the ip address for and the cgi script indicated that there were no disks connected, as I expected. However, when I tried to use Qfinder pro it does not find any QNAP devices.
The thing is that if I start the QNAP with all 4 disks connected, I can not access the cgi script on my ip address for the QNAP.
Linxent Admin
Hi Marcus.
I’m not an advanced tech when it comes to CGI scripts and Qfinder issues but I did some searching for you and found a few things to try when others have experienced Qfinder not seeing the QNAP NAS. Some have been able to connect successfully using the following 2 methods: 1) They connected their compute directly to the NAS network port. 2) They accessed their router and assigned a static IP address to the NAS (identified by its MAC address). That’s about all I can offer; I hope it helps in some way.
Bob
A great help to a befuddled novice searching in the dark.
Linxent Admin
Glad it helped, Bob.
TimothyPrere
Good QNAP reset procedures. Excellent details. Helped me a lot.