These are Microsoft Publisher Business Cards settings you can use to fix printing misalignment. They’ve always been off for me in the past, even with the leading Avery 8859 template and business cardstock. So, keep reading to see all the correct settings to use! Also, this is part of the Blog Planning category and relates to organizing and “Home Office Setup” planning.
The MS Publisher Business Cards Printing Problem Stated
While there are all kinds of templates everywhere for business cards, there are common issues with alignment that are excessive. This article focuses on using Microsoft Publisher with an example but you can easily use this methodology on other apps. There are tons of online back-and-forth tech discussions and support chats that just seem to end up with excessive questions being asked that don’t end up much towards a solution.
As I’ve worked with printers back in the dot matrix DOS days up through modern models of today, I hope this can get you closer to ruling out enough possible causes to resolve your issue. To begin with, there are some key types of issues with printing business cards. The two most common issues are technical issues such as misalignment and physical issues such as printer jams. During this article, you’ll see some Publisher page settings I use for the Avery 8859 glossy business cards as an example. You’ll also see how to manually mark and make your own adjustments to settings in case you’re using another template.

And you’ll see a manual method of how you can work on adjusting your app’s business card template page settings without wasting a lot of cardstock. Visit https://Linxent.com/blog often for new articles on easy-to-follow technical procedures, fixing IT related issues, home office setup, and much more.
Technical Causes
Most of the time, the cause of business card printing issues is going to be from the app’s printer settings not coinciding with the cardstock cutout or printout borders. However, a few times it’s something else so, we’ll begin with a structured plan of narrowing down by the process of elimination. This process also helps reduce the waste of cardstock in testing.
Resolutions to Check or Apply
Here is a full list of areas to check or apply. By going through these areas, you’ll be in a much better position to resolve your issues.
Starting Point: Get latest patches and updates
Best Practices for the majority of technical issues begin with obtaining the latest updates overall. While you might be confident that’s not the cause, it’s up to you to decide what your starting point for fixing will begin. For technical support staff, it’s often going to be starting with patches of the system; however, many just limit it to ensuring
you have the latest printer drive only.
- Get the latest updates and patches to your operating system, e.g., Linux, IOS, or Windows Updates.
- Update to the latest updates or patches for your app being used to produce the business cards. This might be MS Publisher, MS Word, Adobe products, or Apple.
- Ensure you’re using your latest printer driver available.
- Note: Sometimes the driver chosen by the operating system isn’t going to work right or won’t have as many features or options for settings. You can optionally try to download and manually install the printer manufacturer’s current driver to use.
- Even though you might not be prompted, it’s a good idea to restart your computer after updating a printer driver.
Check These Basic Print Settings in Publisher
With your business card file open in Publisher, when you click , you’re taken to a type of print dialog screen with lots of options. Along the visible column, you’ll see to check on some things like double-sided printing options, and so on. The key one that you’ll be using will be the hyperlink named “Printer Properties” as shown right next to the printer dropdown box.
You’ll want to click it and ensure the proper paper media is selected, such as “cardstock”, “glossy”, and so on. The types of choices will differ and might be bound to your printer driver being used. After making any changes, click . Now, when you print, your printer will use those settings or, with some printers, it will stop and prompt you to respond if it should use your saved printer settings or the selected settings you just made. It’s just as a safety
precaution.
Recreate Page Setup Settings in Publisher Using A Template
There are many settings to align a particular cardstock with the Publisher software. If experiencing alignment issues, keep your current file and start with a new, blank Publisher file and save it using a different file name. You can copy-and-paste your objects over once you get some initial settings established. You’ll start first with locating and applying a manufacturer’s template to your blank slate. My example will be to locate the Avery 8859 glossy business card template in Publisher.
Example: Locate the Template “Avery 8859”
In Publisher, you’ve created a new document. As there is a portrait view and a landscape view choice, this example uses the first one shown as in the portrait view.
- Then, click on menu tab “Page Design”.
- Click on “Size | More preset page sizes…”.
- Within the new popup window, scroll about 1/3 downward to click on the item named “Avery US Letter”.
- Then, in that new popup windows, scroll about 40% downward to locate the category heading “Business Cards”. The category names are alphabetical. Under “Business Cards, select the item named “8859 Clean Edge Business Cards” and click.
Page Settings Changes
Now, while still in the tab “Page Design”, click on the “Page Setup” lower-right arrow selector to open an expanded “Page Setup” window. It is here that you’ll see the default settings for this example of the “8859 Clean Edge Business Cards”.
From here, these are the settings that you’ll modify to correct any misaligned business cards printouts. Here is the method to use to fix your misalignments. You’ll make a “Test Printout” on paper and will compare it with a “Marked Template” you’re about to make. You’ll then keep modifying your “Page Setup” settings until your latest “Test Printout” aligns with your “Marked Template”. It’s tedious but works well. We’ll now proceed with the making of those 2 key items.
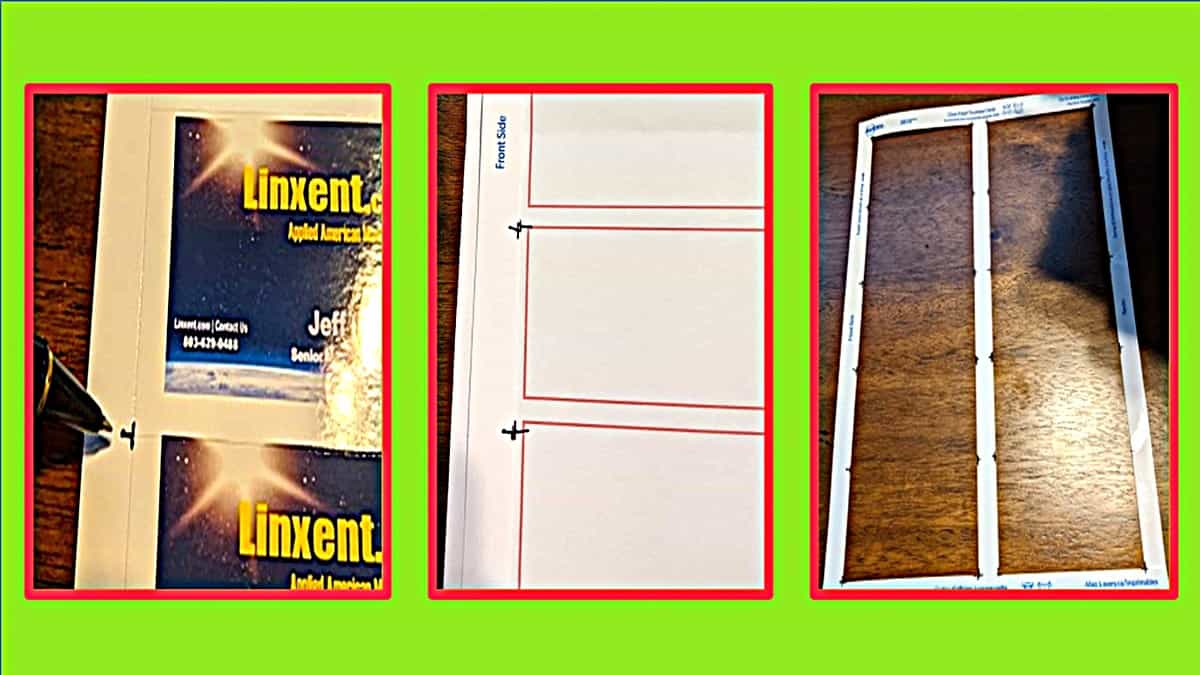
1. Make A TEST PRINTOUT of Publisher Business Cards
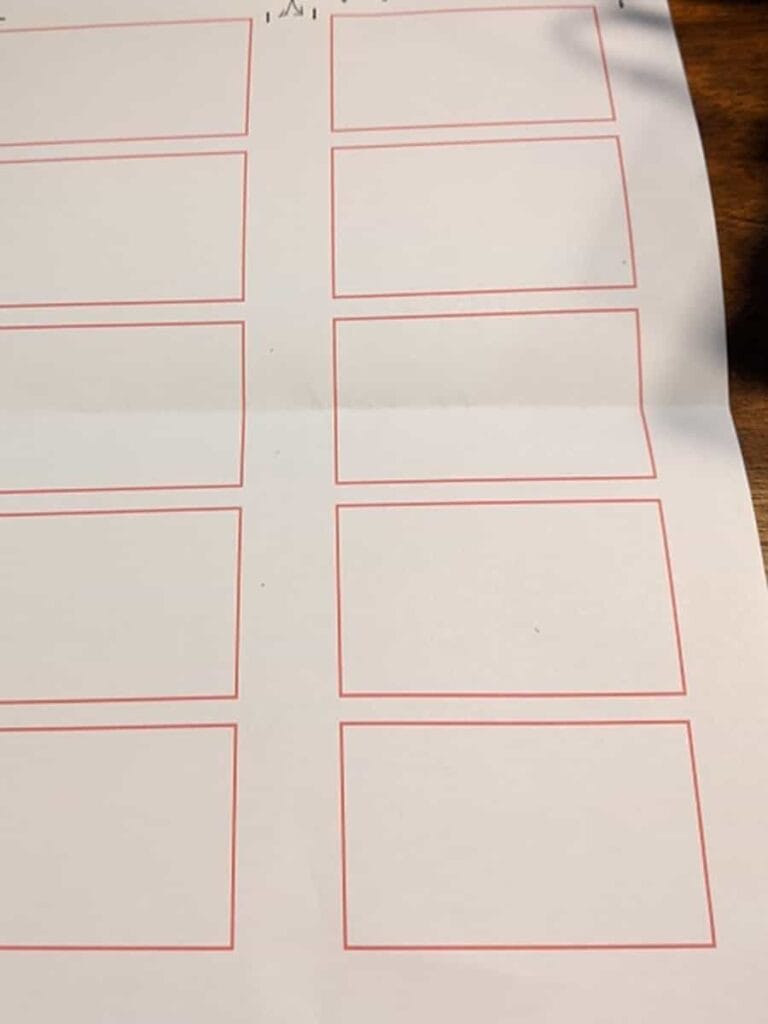
Under the “Insert” tab, click on “Borders & Accents…”. Then, insert a simple border and shape it to fit precisely on the inner, rectangular grid line. This will still leave you a margin area outside your border.
Click to save the file and print this out on a regular sheet of paper. You’ll then have a sheet of paper with 10 rectangular-shaped outlines (borders). This represents your current business cards, if it were to be printed out on cardstock. You’ll be using this printout to fix your settings. We’ll refer to this later as your “Test Printout“.
2. Create a MARKED TEMPLATE for Publisher Business Cards
Now, take a full cardstock sheet that still has the business cards in them. You probably have one left over from a previous mishap. It won’t matter if you have anything printed on it or not. You’ll be marking on its border and later discarding the inner 10 business cards. For now, lay it down on the desk and mark each outside corner of each business card.

You will want to see your marks on the outer shell without the business cards later so, ensure you’re marking the border just outside the perforations of each business card. Make your marks reasonably precise so you can use them to line up what you’re about to print out in the next step. Then, “punch out” (remove) only the 10 business cards from the cardstock sheet you’ve marked up. This will leave you with a “Marked Template” for comparing with your future “Test Printouts”.

3. Compare the “TEST PRINTOUT” with the “MARKED TEMPLATE”
Next, you’ll place your first Test Printout under your punched out Marked Template. While you’ll match it up vertically with the tops and bottoms of both to match, you will move the Marked Template over to right until it lines up close to your Test Printout’s shown borders. Then, when you look at the Marked Template, you’ll see the Test Printout on where each “card” is off alignment.

Because there are many sides that might be off, we’ll focus on one aspect at a time. So, first focus on the top border of each card ONLY. Don’t worry yet about the bottom or the left or right sides yet. Make a mark (10 marks) on your Test Printout as to where the TOP left corner of each card SHOULD have printed. You might find some that are okay and some (or all) that are off.
Now, set the Marked Template aside and review your Test Printout with your marks. Observe and decide if it’s a matter of just lowering or raising all of the cards or if it gradually gets worse down the page. If they all seem to be off the same amount, you’re in luck and you only have to change a setting to raise or lower them all to fix that part of the issue. If they all seem to gradually increase off alignment, then you’ll have several settings to tweak and retest
Change Settings To FIX Publisher Business Cards ALIGNMENT
Changing the TOP MARGIN Setting
Let’s say you have the worse problem and they all gradually display being off alignment more and more down the page. So, since we’re just focusing on the top margin for now, just change the “Top margin” up or down at first. You can visually see the impact of each setting on the small preview pane that’s also shown on the Page Setup screen. Remember, only change that one setting for now and click <OK>.
Now, print it out and and use your latest Test Printout with your Marked Template to compare again. This time, you can get a visual awareness of the impact of your changed setting. But, this time, focus on just getting the top 2 business cards correct for their top margin ONLY. Readjust that Top margin setting until you get the tops of those upper 2 cards correct. Then, and only then, we move to the 2nd setting to adjust to fix the remaining cards’ Top margins.
After you’ve fixed the top margins of the top row of business cards, make a note of that changed setting. It can serve as a point to return to if you get distracted with other things. Also, periodically save your file to retain your gradual changing of settings.
Changing the VERTICAL GAP Setting
Now, in looking overall on the degree of the remaining rows and their Top margins, if they’re all gradually misaligned, we’ll next look at the “Vertical gap” setting. Otherwise, once all Top margins are good for all cards, move forward to the next heading for other subsequent settings corrections. So, as before, click up and down on the Vertical gap setting values to preview the image of what impact this does. As you can see, it closes in the top gaps between the cards. This will remove the gradual shifting offset of the top margins with the
remaining cards.
So, as before, make a setting change (Vertical gap), make a new Test Printout and compare it with your Marked Template. Once you have all cards with a good visible Top margin, you can advance to the next correction to make, if any other misalignments remain.
Changing SIDE MARGIN and HORIZONTAL GAP Settings
Now that you know how this works, you can then focus on the left column ONLY and adjusting it starting with the Side Margin. Then, in combination with using the Horizontal Gap setting, finalize this and then proceed to tweak the right column. It’s here that you’ll be making some minor modifications between these 2 settings to coordinate the left and right columns in sequence, and conclude with minor tweaking to complete both.
Fixing Publisher Business Cards Settings for Avery 8859 Template
Here are the settings that I use for my Epson printer to correct the MS Publisher’s Avery 8859 Template settings for the Glossy Clean Edge® Business Cards.
MS Publisher Page Setup Settings
- Page
- Width: 3.5″
- Height: 2″
- Margin Guides
- Top: 0.1″
- Left: 0.2″
- Bottom: 0.1″
- Right: 0.2″
- Layout Type: Multiple pages per sheet
- Options
- Paper width (disabled): 8.5″
- Paper height (disabled): 11″
- Side margin: 0.45″
- Top margin: 0.45″
- Horizontal gap: 0.62″
- Vertical gap: 0.06″
Avery Template 8859 for Other Apps
Avery template 8859 for business cards is also available for apps besides MS Publisher. See them for these additional apps. Download the templates from Avery site for Business Card Template 8859.
- Microsoft Word
- Adobe
- Photoshop
- Illustrator
- Apple Pages
Conclusion of FIXING Publisher Business Cards Printing Alignment
So, you’ve now seen how to test and fix your own alignment of cardstock for Microsoft Publisher Business Cards printing. Also, for an immediate fix, you seen my own list of settings that I’ve used for years for different printers. And you’ve noticed those Publisher Business Cards setting were necessary down to the hundredths of an inch! Leave me a comment about your experience.
Related Posts
- Home Office Setup
- Home Office Technology
- How Do You Start A Blog? (includes entire business planning)
6 comments
Simon
Ive got to write about this for a class I am taking, well
similar to this. This really made it easier for me , so thanks
you A TON.Take care, Shawnta Edelstein
Jame
How did you make your site look this cool. Email me
if you can and share your wisdom. Id be appreciative!
Bank Product Expert
Have you considered how your home office setup may be impacting the alignment of your business card printing in MS Publisher? Perhaps factors such as lighting, desk height, or even the positioning of your printer could be contributing to the issue.
Jeff Baygents - Admin
Although this sounds like an AI generated comment, thanks for contributing to the conversation. I believe the positioning of the printer is the only viable other potential cause; however, the emphasis was regarding the aligning of the printout on the card stock. Thus, any form of physical interference with the card stock feeding out is possible.
Ajyrhobix
Thanks for this post. I wasn’t using it for business cards but it was for the same template of cards. I use these cards for labeling storage location areas. This made everything align perfectly!
Ubra W.
Excellent fix and your settings worked for me! I’ve never been able to get the standard settings to print out my business cards. Thanks!!!