This document aids when setting (or resetting) Kadence Pro theme settings and for recreating on a new web host. Also, this article is listed in our “Create Blog Website” main topic and our overview topic of “How Do You Start A Blog?” Finally, it’s a part of the “Designing & Creating Site” category.
Overview of Customizing Starting Kadence Pro Theme Settings
There are important notes and settings to consider, e.g., knowing that not all settings are saved when exporting theme settings. So, keep reading to learn more.
Extremely Important When Changing any Theme Setting
These theme settings will have significant impact on image sizes that have been tested to use.
- “Content Max Width”
- Default Page Layout
- Default Post Layout
So, if ever planning on changing one of those theme settings, take consideration into planning to redefine the image settings and reoptimizing all images.
Current Pre-requisites Before Changing Kadence Pro Theme Settings
These settings are based on settings within WP as well as other plugins. Here are notes regarding this.
- WordPress | Settings | Media
- Firstly, your own WordPress Media Settings should be changed away from the WordPress defaults. So, the needed media settings to change are shown in our article “Best Size for WordPress Images“.
- WordPress | Appearance | Customize | General | Performance
- Skip down below to this “Performance” section, apply those settings, & <Publish>. So, these settings were changed away from the default after much testing. It is based on the current caching system and if LiteSpeed is used, for example.
- WordPress | Appearance | Menus
- Create your initial menus for the header (primary menu & mobile menu) and footer. Adjusted settings for these will occur later in this article.
- Also, read our complete article on “WordPress Setup: Beginner Complete Tutorial“
Kadence Pro Theme Settings for WP Menu: Appearance | Themes
- Installations: Only after Kadence is active theme, install and activate these in order.
- Free Plugin via WP – “Kadence Starter Templates”: A location for it is also via Appearance | Kadence | Starter Templates.
- Plugin – “Kadence Pro – Premium Add-on for the Kadence Theme”
- Free Plugin via WP – “Kadence Blocks – Gutenberg Blocks for Page Builder Features”
- Plugin – “Kadence Blocks – Pro Extension”
Kadence Pro Theme Settings for WP Menu: Appearance | Kadence
Kadence
- After Kadence Pro has become fully activated, enable these options.
- Dashboard Tab: Pro Addons (Group Heading)
- Header Addons
- Ultimate Menu
- Header/Footer Scripts (also used for advertisement and google analytics code scripting insertion)
- Archive Custom Settings
- Dashboard Tab: Pro Addons (Group Heading)
Kadence Pro Theme Settings for WP Menu: Appearance | Customize
Customize | Colors & Fonts
- Colors: Content Links
- Link Style: “Standard (underline)” is default
- Links Color: MUST swap the 2 colors. One represents before a link is tapped; the other shows after being tapped. Checking both mobile and desktop for PSI, this will resolve that specific PSI Accessibility issue of “Background and foreground colors do not have a sufficient contrast ratio.”.
- Buttons
- Typography: Staying with “System Default” for fonts will enhance performance everywhere. This will use the user’s fonts based on their browser or system used. You won’t need to localize nor optimize Google fonts, etc.
- However, to avoid a specific PSI SEO metric issue of “tap targets not sized properly”, a setting for mobile must be changed. Then, the “Line Height” must be changed from 1.6 to 1.7. So, this is done via clicking on: Colors & Fonts | Base Font: tap on the font size, e.g., 17px. It will reveal more than just font size options. Finally, tap the mobile icon and change the “Line Height” to be “1.7”.
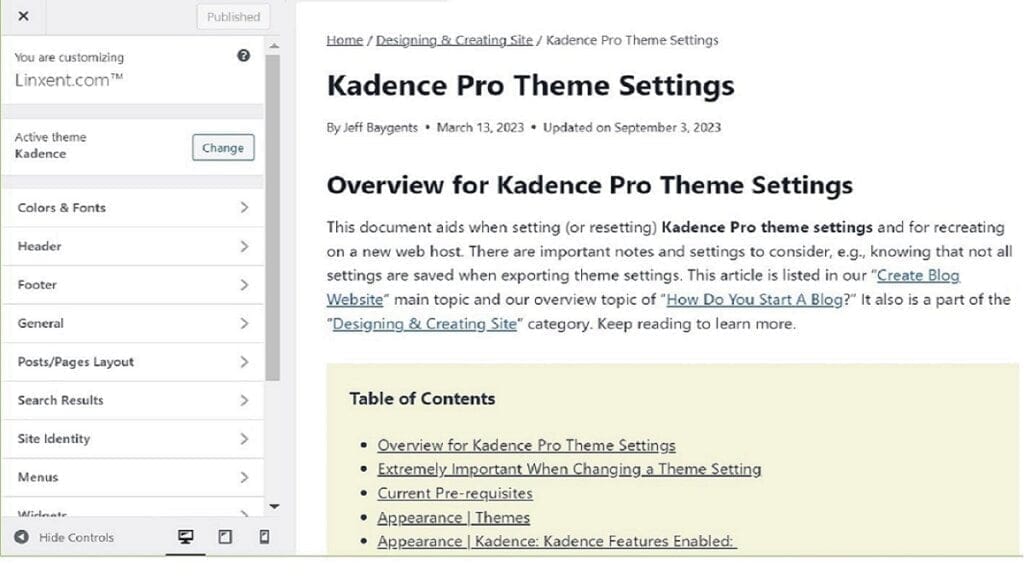
Customize | Site Identity
- Site Icon
- Upload a square image (at least 512×512)
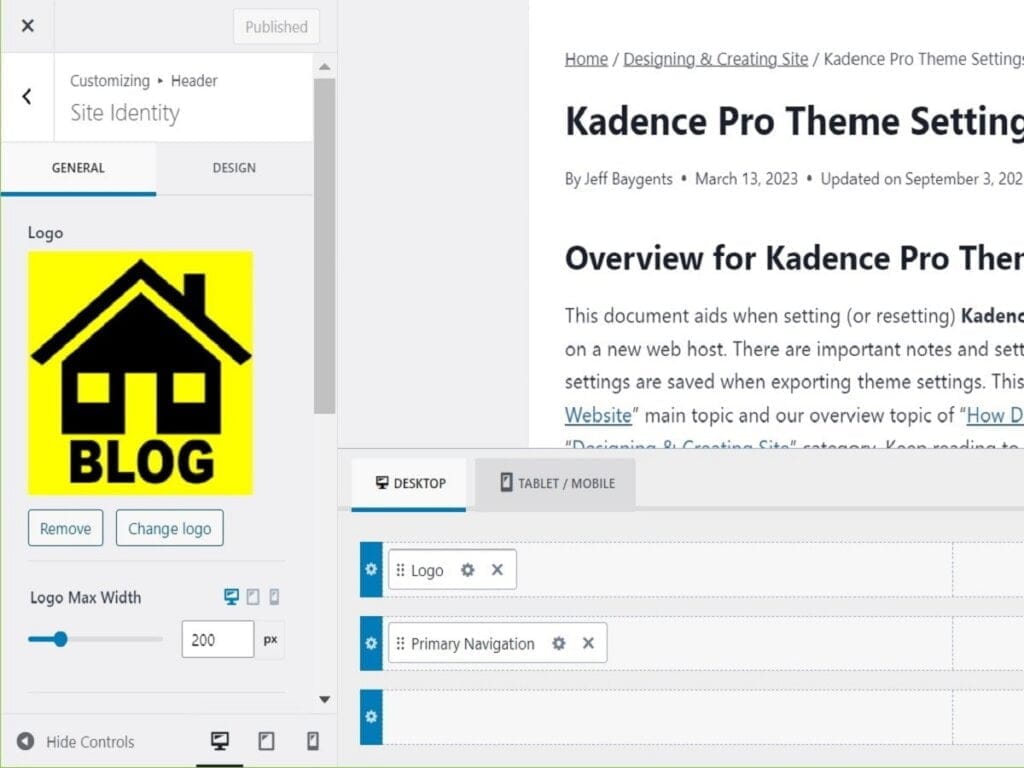
- Site Title and Logo Control
- General Tab | Site Identity | Site Title & Logo Control
- Firstly, upload a Logo image to the Media Library.
- Then, set Logo Max Width (default 200). Also, see our image best sizes article for more info. I set mine to Desktop 100, Tablet 75, & Mobile 50.
- Note: Must select mobile icon here to reveal an option if a “Different Logo for Mobile” is desired.
- Then, set the Logo Layout: Logo Title & Tagline
- Then, set your Site Title (this is an example, of course): DarnGoodRecipes.com™
- Then, set your own Tagline (this is an example): Southern, Easy, Tasty
- Finally, click to <Publish> Theme Changes & Close customizer.
- General Tab | Site Identity | Site Title & Logo Control
Kadence Pro Theme Settings for WP Menu: Appearance | Menus
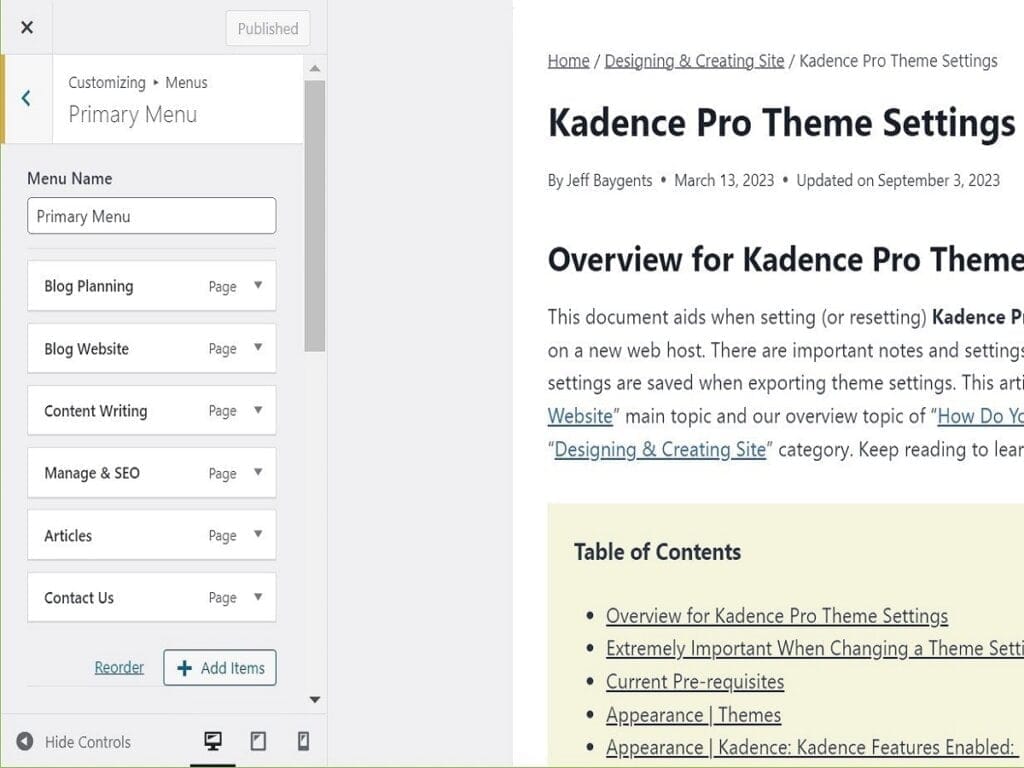
We jump in early to the menus now because of the importance of setting them up for having a functional navigation for the site.
Overall, assign and/or create any needed menus. In summary, here are some suggestions for Menu Names and assignments to their Theme Locations.
- Then, click to be in the “Manage Locations” tab. Be sure each of the following are selected as shown here.
- Primary: Primary Menu
- Mobile: Primary Menu
- Footer: Footer Menu
Kadence Pro Theme Settings for WP Menu: Appearance | Customize
Customize | Header
Customize | Header | Main Bottom Pane
- DESKTOP Tab
- Top Row: Logo (left), Search Bar (right)
- Middle Row: Primary Navigation (left)
- Bottom Row: empty
- TABLET/MOBILE Tab
- OFF CANVAS: Mobile Navigation
- Top Row: Logo (left), Search Bar (middle), Trigger (right)
- Middle Row: empty
- Bottom Row: empty
Customize | Header | Left Pane (Design Tab)
- Screen size to switch to mobile header: 1200 px
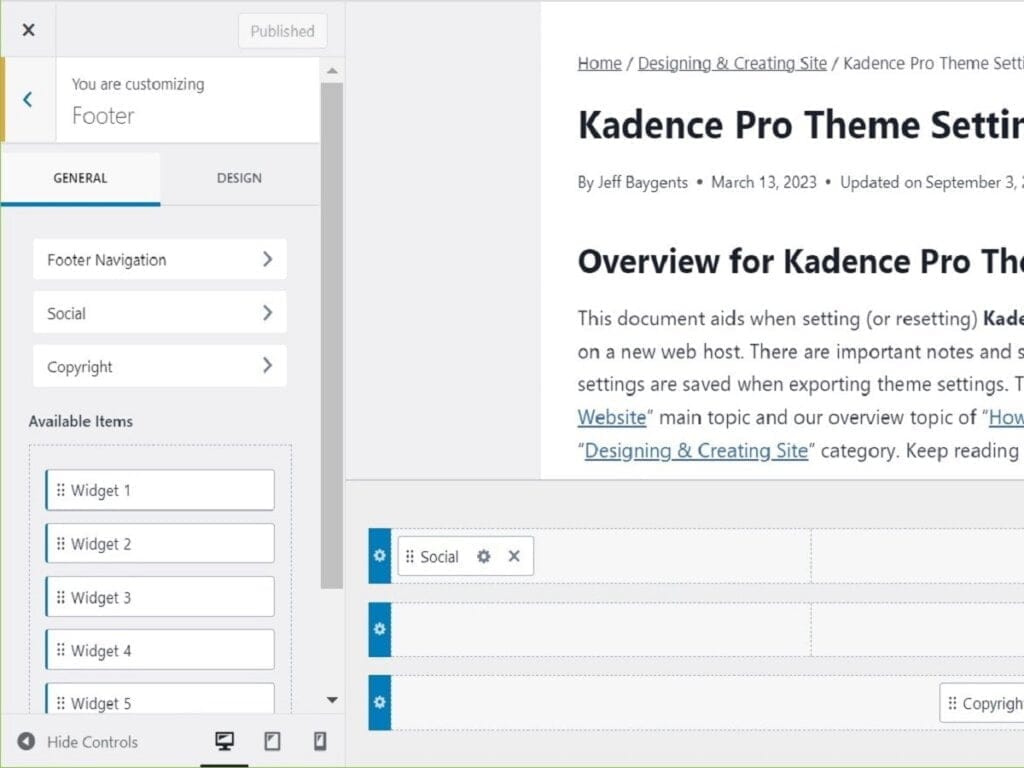
Customize | Footer
- Top Row: Drag n’ Drop “Social” to Left column
- Middle Row (make 1 column): Drag n’ Drop “Footer Navigation”
- Footer Navigation Configure | General tab: Content Align (Left)
- Footer Navigation Configure | Design tab: Items Top and Bottom Padding: 0.3 em
- Bottom Row: edit Copyright (middle column)
- Copyright Configure | General tab: copy-and-paste below text to replace default text:
{copyright} 2023-{year} DarnGoodRecipes.com™. All rights reserved.
Customize | General
- Layout
- Content Max Width: 1290 (default)
- Then, Content Top and Bottom Spacing: 5,3,2 (default = 5,3,2 for desk, tablet, mobile)
- Then, set the Narrow Layout Content Max Width: 842 (default = 842)
- Sidebar
- Scroll To Top
- General tab
- Enable Scroll to Top: disabled (there are random issues w/LiteSpeed cache settings of it being an excessively large screen section on some posts, visible and hidden)
- Settings only if “Scroll to Top” is enabled
- Align: Right
- Visibility: add tablet & mobile to “Visibility”
- Check the sizes and padding/border for tablet and mobile
- General tab
- 404 Page Layout (nothing to set in the beginning)
- Comments
- Move comment input above comments: enabled
- Then, enable “Remove website URL”.
- Breadcrumbs
- Select: “Default”
- Then, change font size to be 18
- Social Links (set your own URLs)
- Facebook: https://www.facebook.com/darngoodrecipes/
- Twitter: https://twitter.com/darngoodrecipes
- Instagram: https://instagram.com/darngoodrecipes/
- Pinterest: https://www.pinterest.com/DarnGoodRecipes
- LinkedIn: https://linkedin.com/in/darngoodrecipes/
- Email: darngoodrecipes@gmail.com
- Performance
- Enable Scroll to ID (default enabled): enabled
- Load Google Fonts Locally, Preload Local Fonts: disabled (system fonts are used so, it’s not needed; also, if used, FlyingPress or LiteSpeed settings can handle fonts.
- Enable CSS preload: disabled (default = disabled if using Flying Press or LiteSpeed (they each handle CSS). Enabling this often adds to unused CSS performance lag if it’s handled also by another source.
- Finally, click to <Publish> Theme Changes & Close customizer.
Customize | Posts/Pages Layout | Page Layout
- General tab
- Page Title
- Show Page Title: enabled (default is enabled)
- Then, set Page Title Layout: Above Content
- Title Container Width: Standard
- Page Title Align: (default is none selected)
- Then, adjust the Title Container Min Height:
- Desktop: 100 (default=200)
- Tablet: reset to use default
- Mobile: reset to use default
- Title Elements
- Show only (tap “Toggle Item Visibility”: Title
- Default Page Layout
- Default Page Layout: Normal (default)
- Page Default Sidebar: Sidebar 1
- Content Style: Boxed (default)
- Content Vertical Padding: Top Only (default = Enable)
- Then, very importantly, set to Show Featured Image? Enabled
- Featured Image Position: Above
- Featured Image Ratio: 16:9 (default is 3:2)
- So, this is usually reserved for Posts, not Pages. Therefore, set Show Comments: disabled
- Page Title
- Design tab
- Page Title Font: Yellow, Dancing Scripts, 700, 50 px
- Then, using your own colors, set Page Title Background: Gradient (Linear-180, Top-Black, Bottom-Red)
Customize | Posts/Pages Layout | Single Post Layout
- General tab
- Post Title
- Show Post Title? Enabled
- Then, set Post Title Layout: In Content (default); note: “In Content” is needed for image to show in Google Search Results (mobile).
- Post Title Align: (default is none selected)
- Title Elements: Item visibility enabled for all except Categories & Excerpt.
- Meta items enabled: show author, enable author link, author label: “by”, show date, show last updated date, show only if different from published date, updated date label: “updated on”, show comments, show only if post has at least 1 comment
- Default Post Layout
- Default Post Layout: Narrow (default)
- Post Default Sidebar: Sidebar 1
- Content Style: Boxed
- Content Vertical Padding: Top Only (default = Enable)
- Then, very importantly, Show Featured Image? Enabled
- Featured Image Position: Above
- Show Featured Image Caption? Disabled
- Then, set Featured Image Ratio: 16:9 (default was 3:2)
- Overall, this can be a small performance hit. So, Show Post Tags? disabled
- Show Footer Area in Boxed Mode? disabled
- Show Post Author Box? disabled
- Also, this is a performance hit, too. So, set Show Post Navigation? disabled
- So, this is a huge performance concern. Therefore, set Show Related Posts? disabled (removes about 202 DOM objects)
- So, for “Posts” this is okay to Show Comments? enabled
- Show Comment Date? enabled
- Design
- No changes
- Post Title
Customize | Posts/Pages Layout | Archive Layout
- General tab
- Archive Title
- Show Archive Title? Enabled
- Then, set Archive Title Layout: Above Content
- Container Width: Standard
- Post Archive Title Align: default is no selection
- Container Min Height: default
- Then, set the Title Elements: show Breadcrumb, Title
- Archive Layout
- Archive Layout: Normal
- Post Archive Default Sidebar: Sidebar 1
- Content Style: Boxed (default)
- Then, if using a certain grid plugin, consider to change the Post Archive Columns: 1 (default is 3), if using Content Views Pro plugin to assign itself to archives
- Item Image Placement: above
- Post Item Layout
- Post Item Elements: Toggle item visibility for Feature, Title
- Archive Title
- Design
- Breadcrumb Colors: 1st color – white
- Then, using your own preferred colors, set Archive Title Background (all devices): Gradient, 180, black (top) – white (bottom)
- Publish Theme Changes & Close customizer
Customize | Search Results
- General tab
- Search Results Title
- Show Search Results Title: enabled
- Search Results Title Layout: In Content (default)
- Search Results Title Align: default is none are selected
- Archive Layout
- Archive Layout: Normal
- Post Archive Default Sidebar: Sidebar 1
- Content Style: Boxed
- Search Result Columns: 1, if using Content Views Pro plugin and assigned to Search layout (default is 3)
- Item Image Placement: Above
- Search Item Layout
- Search Item Elements: Toggle item visibility for Feature, Title
- Search Results Title
- Design
- No changes
- Then, click to <Publish> Theme Changes & Close customizer.
Customize | Menus
- This item was already covered by the starting steps at the beginning. So, refer back to it if you haven’t yet covered it.
Customize | Widgets
- So, none are being used. Also, widgets are often a moderate to heavy performance cost. Therefore, keep that in mind for the future.
Customize | Homepage Settings
- Your homepage displays: A static page
- Importantly, set the Homepage: select the page (using your own, of course) “Darn Good Recipes”
- Then, keep the Posts page: empty (shows “—Select –“)
Customize | Additional CSS
- Copy this custom script here to fix an accessibility issue (insufficient color contrast) with the Kadence native Comment Form, reported by Google PSI metrics when Kadence setting enables to allow comments:
div#respond > form#commentform > p.comment-form-comment > label.float-label,
div#respond > form#commentform > p.comment-form-comment > textarea#comment,
form#commentform > div.comment-input-wrap > p.comment-form-author > label.float-label,
form#commentform > div.comment-input-wrap > p.comment-form-email > label.float-label,
form#commentform > div.comment-input-wrap > p.comment-form-cookies-consent > label,
form#commentform > div.comment-input-wrap > p.form-submit > input#submit{
color: #000;
}
div#respond > form#commentform > p.form-submit > input#submit {
background: #225891;
}
Customize | Custom Scripts
Important Note: Regarding Google Tag script, you can use it in either the Kadence Theme, as defined here, or via your SEO Plugin. Both locations aren’t needed. For AIOSEO plugin, it’s in AIOSEO menu under “General Settings | Webmaster Tools | miscellaneous verification”.
- Add Google tag script under >> Appearance | Customize | Custom Scripts | Add scripts into your header:
——start of copy text (below) for adding in Google Analytics ——–
<!– Google tag (gtag.js) –> YOU WILL HAVE YOUR OWN SCRIPT OF SEVERAL LINES TO HAVE </script>
—— end text copy (above) ——
- Then, click to <Publish> Theme Changes & Close customizer.
Customize | Import/Export
- Export (it makes a partial backup of settings)
- Whenever making settings changes, update this document.
- Then, make a partial backup of the settings using the export function.
- Important: Settings that don’t get backed up are flagged with “Not exportable”. Whenever Importing from the backup, refer to the settings in this document to update them since the export file doesn’t carry all settings.
Table of Contents Block: Custom Default Settings
In order to ensure Google PSI metric for SEO is satisfactory, the Kadence Table of Contents Block must have a setting changed. Here are also some added minimal settings for establishing some default settings for all TOC insertions.
- Create a new post (it will be temporary), assign any title, and save it as a DRAFT.
- Then, insert the Kadence block “Table of Contents” into the post, select the block, and ensure you’re viewing the Block Configuration Settings (on the right side).
- After that, from these block settings, ensure the tab “General” is selected.
- Then, uncheck all “Allowed Headers” choices except H2.
- Scroll up and tap the tab “Style”.
- Then, scroll down and tap to expand “Container Settings“. After that, tap the circle of “Background” and change the “Hex” setting to be the word “beige” or other color of your default choice for future backgrounds for TOC.
- Important to prevent one issue of the mobile metrics for “SEO” in Google PSI: So, scroll up and tap to expand “List Settings“. Then, tap the Mobile phone icon to reveal mobile settings only. Also, change the “List Item Gap” to: 5 px.
- Then, scroll up and tap the tab “Advanced”. After that, scroll down and tap to expand “Block Defaults. Then, tap on <Save as default> and respond <Ok>. That confirms saving these settings for all future default settings for inserting the Kadence TOC block.
Table of Contents Default Settings Important Notes
So, the usage of TOC “Collapsible Settings” adds a small performance concern. Therefore, these are best reserved for manual changes on a per post basis.
Finally, any of these Table of Contents block settings (along with others) can be individually changed. Therefore, this can be done after inserting the Kadence TOC block into any Post or Page. For example, at times, you might want different settings than the defaults you saved. For example, you could set headings to appear such as H3 or H4.
Final Steps of Kadence Pro Theme Settings
- If using Redis, purge Redis Object Cache.
- Also, if using any other Object Cache, empty it.
- Then, purge any CDN Cache (everything).
- Specific Cache Systems or Tools:
- So, if using Flying Press: Purge & Preload Cache.
- Finally, wait about 3-5 minutes and test site and/or metrics. However, know that the entire sites metrics won’t be fully ready until any caches have repopulated.
- However, to check a particular post or page performance metrics, you can speed up its readiness. So, that’s done by visiting the particular page or post via a desktop and mobile phone. Then, check that URL’s metrics.
Conclusion of Kadence Pro Theme Settings
So, these are unique Kadence Pro theme settings as a strong example of how to get setup in Kadence. However, it’s recommended that you make your own changed preferences along the way. So, now that you’ve got your Theme settings to your preference, go ahead and see how to format a blog post recipe.

3 comments
Leslie Peawn
Setting Kadence up has been overwhelming. This helped me keep my focus and got it started without a problem. Thanks!
jack
Thanks for wonderful information I was looking for this information for my mission.
TimothyPrere
Good starting Kadence settings for me.