This is an easy startup guide with pictures of a WordPress setup. It has the most urgently important settings to start out with. Prevent future structure issues now and follow these easy steps. This article is listed in our “Create Blog Website” main topic. This is a follow-up configuration article supporting “How To Install WordPress“.
Introduction to WordPress Setup
Installing and working through the WordPress Setup at the very beginning is significantly important for years to come. That’s because there are some settings that will harm your site traffic later if you change it. Also, there are some sizable structural and concepts of organizing that will have SEO impact if you change it later. Keep reading to see those stages.
Step 1. Prepare Your Domain Name, DNS, & Host
You begin by having your own domain name purchased and registered. And, it’s best if you are with a web host provider who also doubles as a domain registrar and DNS service provider. The registrar is the one who stores your domain name for you. The DNS provider keeps all the technical records that points everything on the Internet to your site and mail. And the web host provider (aka “host”) is the one who will store and display your new WordPress site to readers on the Internet. Most of your big name branded “hosts” offer all 3 services typically. Read more at “WordPress Site Hosting Services“.
So, after you have your domain name, ensure you’re using full 3 services WordPress Hosting that gives your site great performance, service, and reliability. Make your host be your domain name registrar and DNS Service provider.
WebPress Hosting Accounts To Avoid
Internet reviewers posting articles like “Top 20 Best Host Providers” commonly list certain names repeated only by popularity, and not on performance. Several hosts shown are far less on performance so, be careful. It is extremely clear to me someone did not review individually those services. It’s best to avoid a host that doesn’t list their detailed technical specs for their plan offerings. Those are the plans that don’t tell you how much RAM or CPU cores. If you don’t see their CPU cores listed, it’s most probably just one.
WordPress Website Hosting Companies Prerequisites
Food Blogs need 2 CPUs to start with for your web server. Also, don’t choose shared hosting. That’s those cheap $7-$20 per month plans. Start out with a VPS (Virtual Private Server) plan. Here are some considerations to think about. Everyone’s skill level and plans vary. HostArmada.com has all these prerequisites in the several VPS plans and they have all 3 services referenced earlier.

This is a list of some minimums but also some options to remember to consider for your web hosting account. Having adequate minimal power gives you future opportunities when you want to create and add new features to your site.
- 2 CPU cores
- 2-4 GB RAM minimum
- Free cPanel (recommended), which is a popular industry standard that a lot of guides and tips are written for.
- WHM (recommended), gives you extra access to your server. Some let you reboot, and set some server settings.
- Firewall included (or prepare to pay extra)
- Bandwidth 1-2 TB
- Storage space 20-30 GB minimum (using SSD drives or better)
- Free SSL
- Free Memcache or Redis included
- Allows you to have a managed WordPress (lets you install WordPress)
- Number of websites: can be 1 but be prepared to changes hosts if you want more in future. Some allow you 3, 5, or unlimited.
- Free Private Nameservers
- DNS Management
- Addon Domains or Subdomains (for possible future changes, like adding on a store site or for multiple domains)
Step 2. Install WordPress Manually & MySQL on Your Web Host
The importance of the WordPress installation and its MySQL Database is critical to your site’s quality of life. There are some things that can’t be changed down the road. Additionally, making changes to some other aspects down the road can be painful and harmful to your success..
Install your WordPress and site using your own chosen name for your database, login credentials, and and directory. The WordPress installation instructions include tasks involving site title, create database, username and password, first database user, need an ftp, whether you want auto updates, and other areas.
Our WordPress installer guide (“How to Install WordPress“) makes it easy and shows you everything to type into all the text boxes. It’s a step-by-step tutorial that lets you learn how to install WordPress using Softaculous, a popular apps installer most hosting plans use. Use it when you’re ready to install WordPress from your hosting provider.

How to Install WordPress – Linxent.com™
Step 3. Initial WordPress Setup Configuration Settings
Right after WordPress is installed, here are the stages to follow that make it super easy. These are step-by-step for a solid startup foundation for the site.
As mentioned earlier, it’s super easy to install WordPress, following our in-depth guide and complete tutorial. Right after you’ve install WordPress, you’ll see the “Welcome to WordPress” banner. You’ll need to click <Dismiss>. All the rest are sections to follow for various settings to fill in.
WordPress Reading Settings
Until you’re ready later on, you want your site not seen by search engines. It doesn’t stop it from being seen on the Internet, it just prevents you from having initial bad SEO right away. So, ensure the checkbox is checked for “Search engine visibility”.


WordPress Dashboard
Here’s the initial Dashboard you might see. Scroll around it a little bit to get familiar with what it contains. Notice this example shows the site is good but has some needed improvements. We’ll address them as we move forward into plugins and themes.

WordPress Plugins
Here are some example plugins that are pre-installed that we are uninstalling. The anti-spam plugin can be reinstalled if you decide you want it later. In the meantime, delete the plugins “anti-spam” & “Hello Dolly”. Your host might have one or more plugins that you need to retain so, if you see something other than these, consider what to do with those as well. You might have a caching plugin or other item that is required or needed by your host. After removing these 2 examples, return to the “Tools | Site Health” menu item and observe that 1 of the recommended improvements has been removed. You’re on the road to having a stable site. We will return to this Plugins area soon.


WP Site Health
The Site Health is a summary screen for every website to make your life easier to ensure yours has the most basic items addressed. While in the “Tools | Site Health” menu screen, tap to expand the security item referencing removing inactive themes. Here’s the example of that expanded recommended improvement of deleting inactive themes.

Remove Inactive Themes
Click to go to menu item “Appearance | Themes”. In this example you’ll see several themes shown.

One is automatically “Active” and the others are considered inactive. Tap only onto each inactive theme, one at a time, and click on the <Delete> link on the bottom right corner. Do this until there is only one theme remaining and it’s the original “Active” one.

Then click to go to Tools | Site Health and observe that you’re down to just one recommended improvement left. We’ll address the page cache flag a little later. Excellent progress is continuing so, keep reading!

WP Comments
Directly in the “Comments” menu item, you’ll always see all of them listed here. The default installation displays an example comment. Hover over the comment’s author and click to “Trash” it.

WordPress Settings
Now, we’ll go over some of the important settings to fill in and apply. The following areas cover each section that are under WordPress (aka WP) Settings.
WP Settings | General
Fill in all of these settings’ text boxes. You can change any of them later but, for now, get something typed in them. And, fill in the administration email address with something that’s active and used, even if it’s your personal email address. Each of these images show examples of entries that can be made, including the time zone.


The “Site Title” in this example used the domain name but you can use any site title you want to appear, e.g., the company or organization name.
The tagline can be any saying that you want, if any. You can leave it blank.
The WordPress Address (URL) and Site Address (URL) will be the same, starting with “https://”.
The Administration Email address usually is going to match the email address you set during the installation of WordPress.
The Membership checkbox should be unchecked until you’re setting up membership functionality.
The New User Default Role is usually set to the lowest user level of “Subscriber”. It doesn’t matter if you have any subscription items or not. This is just the lowest level of permissions.
The final setting is to scroll through the list to identify the time zone you want your site to represent.
WP Settings | Discussion
Make these two changes to the initial default settings in the Discussion screen.
- Select to enable the checkbox for the selection “Before a comment appears: Comment must be manually approved”. It prevents automatic spam comments from being approved & posted initially.
- Uncheck the checkbox referencing comment author must have a previously approved comment.
- Also, uncheck the item shown as “Enable threaded (nested) comments X levels deep.” This fixes issues referred as “replytocomm” reported by Site Audits. In the future, you can enable it after you handle that known SEO issue in another way.

WP Settings | Media
Uncheck the Uploading Files checkbox named “Organize my uploads into month and year-based folders”. This is a very critical item to set. It’s too hard to fix later if you don’t. It’s to avoid all images being saved to all kinds of year and month folders. You will want all images in a single folder as this is a popular standard. It makes it easier to find them a year from now and it’s a popular practice for lots of other reasons.


WP Settings | Permalinks
This permalink setting is another very critical item to set in the beginning. It is considered the best practice of today for tons of reasons. One key reason is to reduce the need to change a published post’s URL very often, if ever. Several of the huge, older sites have made the change but only their newer posts reflect the current standard shorter URL.
- Change the option selection to be “Post Name” away from the default permalink structure set at “Day and name”.
- Also, ensure you remove any text that’s shown in the “Category base” and the “Tag base” text boxes.


WP Settings | Privacy
You’re now going to create a default privacy policy for your site. Fortunately, it’s built-in and you can always modify later on if you choose. So within Settings | Privacy, click the button <Use This Page> after ensuring “Privacy Policy” is the selection shown to its left. Just follow any prompts to accept it. It should remain in “Draft” status.

You can then click on menu item “Pages” and you’ll see your newly created Draft of a “Privacy Policy”. You’ll also see a “Sample Page” listed there. The Sample Page is published and active, while the Privacy Policy is unpublished and remains as a draft.

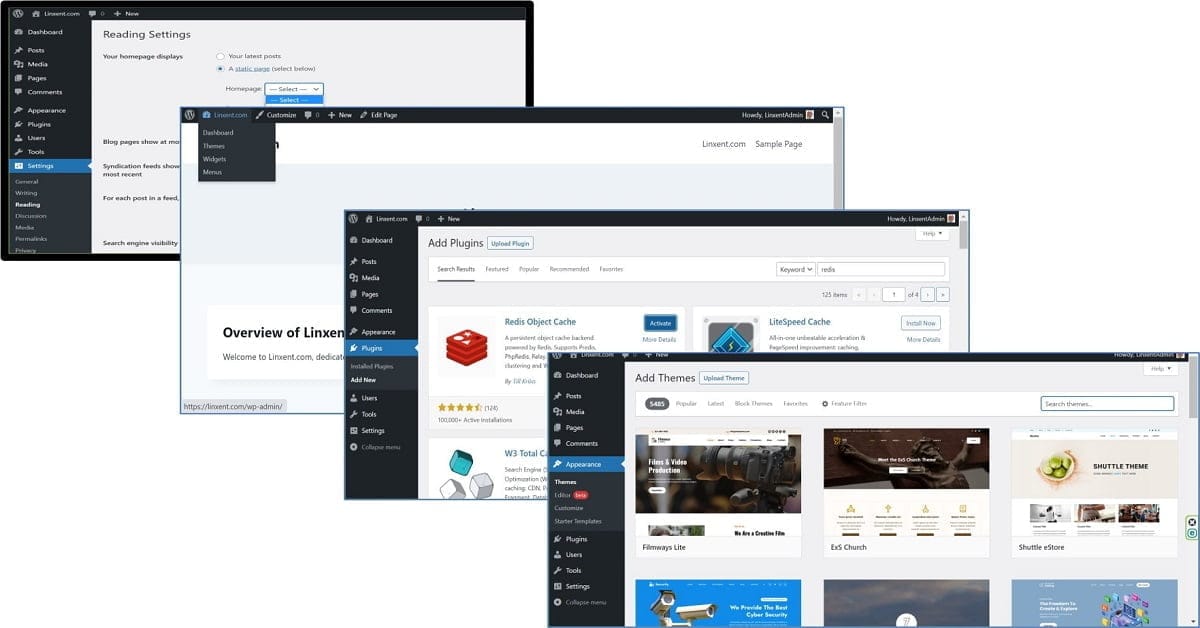
Plugin Installation: Redis
Now we address the last shown Site Health issue from the earlier stages of the settings changes in this example. Your host’s server for your site might be providing you with caching. The 2 most common types of object or RAM (memory) caching are “Redis” and “Memcache”. Reach out to your host to ask bout this and to enable one of those for you. Hopefully, you chose a host that provides it and that it’s free. It’s usually considered best to use only 1 of those types and not both. I chose “Redis”. So, the example shown involves installing the free plugin for “Redis” caching. Hopefully, your host will have a document or recommendation on what settings to use for their system. And, it’s easy enough to change over to the other kind later on if you decide to.
Installing Your First Plugin “Redis Object Cache”
Here are the plugin install instructions if you choose to use “Redis” caching. It also illustrates steps on how to install any of the free plugins available, using Redis as an example.
- Go to menu item “Plugins”.
- In the main pane, tap <Add New>.
- In the “Search Plugins” text box, enter in the plugin’s partial name, e.g., Redis. This reveals the “Redis Object Cache” plugin in the matrix list of related named plugins. Click <Install Now> and follow any prompts.
- After it’s installed, click to <Activate> it.
- Go to menu item “Settings | Redis”. From the main pane, in the “Redis Object Cache” screen, click the <Enable Object Cache> button.
- After a few seconds, all items should appear with green checkmarks. If not, refresh your screen or contact your host’s support. They will only result in green if the Redis caching was established correctly for your hosting server.
Here are all those steps shown below.


Step 4. Designate a Theme
You’re now ready for designating a theme for your site. While selecting a theme is fairly standard, there are a ton of them available beyond the default WordPress theme. I’ve worked with several brand named themes in the last couple of years. I’m using this example as assigning the “Kadence” theme to become the new active one. Follow these instructions and choose Kadence or a different one if you choose.
- Go to the menu item “Appearance | Themes”. In the upper left area, click the button <Add New>.

- You’ll be taken to the huge list of available themes. In the Search Themes text box, type in “Kadence”. When it’s revealed in the grid list, hover over it and click the <Install> button.

- After it’s installed, click the revealed <Activate> button.

Step 5. Installing Starter Templates
Normally, this would come later but the Kadence Starter Templates adds a function we need. It’s an export function of your customized theme settings.
We want enable an export feature of our theme’s custom settings. So, we need to install a plugin for that. Follow this guide to install the plugin “Kadence Starter Templates”.
- Go to menu item “Plugins” and click <Add New>.
- In the search box, enter “Kadence”.
- In the main pane results, click <Install Now> for the “Starter Templates by Kadence WP”.
- When revealed, click the <Activate> button.

You now have an export function for your theme’s settings. And, for the future, you also have some starter templates to choose from. But hold off from that just yet. You’re almost done and you’ll need your basic home page created to apply to any template you might browse through. Let’s move on to that home page next.
Step 6. Create New Home Page
You have an active theme and your foundation settings configured from the previous steps. See what you currently have. Go ahead and visit your domain name on the Internet. You should now see your default and simple site. You’ll now need an actual Page to manage this initial view of your site.

This is a raw semblance of your default site at this point. There is no Home Page yet. Follow this guide to create your Home Page so you can replace the current starting view of your site. With an actual Home Page, you’ll be able to manage its appearance and contents.
- Go to menu “Pages”. Here is a list of your current pages. Recall that the built-in “Sample Page” is published and your “Privacy Policy” remains as a draft. From the main pane in the upper left area, click “Add New”.

- Click to place your cursor in the “Add title” area. Type in your domain name, company or organization name, or other title of your site. Everything typed here can always be changed later easily.

- Place your cursor in the area just below the title. On the far right, click the + sign. This brings up a choice of “Blocks”. In our example, you want to now enter in a “Heading” block, so click it from the grid choices.


- Now type in an example heading like “Overview of (your domain name)”, using your actual domain name without the parentheses. Then, hit <Enter>. Then, type in regular text. This type of block is considered a <paragraph> block and is the default for every entry unless you want to change it.
- On the right pane, click the <Publish> button twice.
- Click the <View Page> button to see what it looks like.

Designate New Page as Home Page
Now, you created a new page and it’s time to designate it as your Home Page. Go to menu item “Settings | Reading”.
- From that main pane, under “Your homepage displays” section, change the option selection to be “A static page…”.
- Then, for the Homepage dropdown list, choose the page title that matches the one you just created. In this example, we chose “Linxent.com” as the page’s title.

- Then, at the bottom, click to <Save Changes>.
- Now, you can visit the Pages area and hover over the “Sample Page” and delete it.

Note that your newly created page is now identified as a “Front Page”. That’s the same as “Home Page”. Also notice under the Date column of that list, your new page is showing as “Published”. That means it’s now visible on the Internet. So, return to your browser and go to your domain name to see how it’s updated.
Saving Custom Theme Settings
Now, go to menu item Appearance | Customize. It takes a few seconds wait. Then, on the new left pane, scroll down to “Import/Export”. Click to <Export> and, when prompted, choose a file location to save your theme’s customized settings. It’s important to note that other plugins or enabled features or added blocks settings might not be saved. So, it’s recommended to save notes on all settings so they can be manually regenerated.

Step 7. Choose & Install Plugins
Over time, you’ll want to choose and install more WordPress plugins to give you more features and functions. They will involve improving performance, SEO, images, further caching, and more. You’ll want to use a lot of caution on choosing to install each plugin. Some might state they don’t slow your site down but, in fact, they might. Learn how to check your site’s metrics after you’ve installed and configured a new plugin to use. I’ve dropped quite a few very popular ones because of various metrics hits.
Step 8. Customize Your Theme & Site
It’s a very detailed set of options for customizing your website’s theme. We’ve created an example of one for you at Kadence Pro Theme Settings.
We stayed with the default Kadence template of our Kadence Theme. And then, we customized it to remain high performance and a simple design and good solid structure. You want to customize your theme for devices of desktop computer and mobile devices. I will routinely have my phone on the desk for quick confirmation of design changes as to how they appear.
Under menu item “Posts”, you’ll see key areas of “Categories” and “Tags”. In the beginning, your Posts will be assigned to “Uncategorized” category. Soon, you’ll want to read more about defining categories and tags for your posts. You won’t need that until you’re ready to have at least one post under each category you decided. You won’t need any tags initially but later you’ll want them for filtering certain posts to display for a specific subtopic.
Step 9. Start Creative Writing & Publishing
It’s perfectly fine to continue to change your layout and design in between your creating and publishing posts and pages. You’ll even change your navigational menus a few times most probably.
Related Articles
Here are some related articles. These cover details of various stages of your site development as well as improving posts and topics.
- How Do Your Start A Blog?
- Best Size for WordPress Images
- How to Format a Blog Post Recipe
- Topic Clusters Examples
Conclusion
You’ve now seen all the starting steps of configuring your WordPress setup with a new domain and its site. With these successfully completed sections and their steps, you affirmed your control and confidence of progress. I just wish I had this article available to me when I began.

1 comment
Mulderig56220
It’s hard to find knowledgeable people on this topic, but you sound like you know what you’re talking about! Thanks