Learn step-by-step of how to Addon Domain cPanel methods. Also, create new, delete old, and simply control individual domains based from one single domain. Save and have multiple domains on one web hosting plan. This article is listed in our “Create Blog Website” main topic. It also is a part of the “Designing & Creating Site” category.
What is an Addon Domain?
An addon domain is a new domain name that resides on the same hosted server as the primary domain. It is served from the same system and resources so, it saves you from having to purchase multiple hosting plans. In many cases, it can be separate enough to operate as a distinct separate entity.
Purpose & Example of Addon Domains
Here is an example of an addon domain. Let’s say your regular hosting plan has one domain and it’s “Linxent.com”. Next, you wanted to create a food blog. So, since your host allows it to be on your same hosting plan, you create a new addon domain. Next, you registered the available domain name of “DarnGoodRecipes.com”. Then, you followed the steps in this article to add it as an addon domain onto the primary domain of “Linxent.com”.
So, they now both co-exist on the same system yet, remain distinct from each other in many ways. They are both unique domains yet, are also on the same server. Finally, examples of their differences are their separate websites, file folders, plugins, media library, WordPress users, permissions, php, ftp, cPanel, and many more.
What is a Sub-Domain?
A sub-domain is when you create a URL prefix in front of your regular domain URL. For example, if your main domain was “mydomain.com”, you could create a sub-domain named “subnew.mydomain.com”. More useful sub-domain name examples might start with “marketing”, “billing”, or “products”.
Purpose & Example of Sub-Domains
There are many reasons for making sub-domains. For example, one reason is for giving partial site control of just that section of the primary domain. Sometimes, departmental permissions are assigned to build or update their own sub-domains. Examples of those kinds of sub-domains are like “marketing.mydomain.com” or “billing.mydomain.com”. Technically, the sub-domain names are “marketing” & “billing”. However, this article is focusing on “Addon” Domains as the focused topic.
How To Create An Addon Domain cPanel Account
This is the start of how to create an addon domain cPanel account. A step-by-step example is given. Also, a best practice scenario is given with some notes anticipating some differences with different people. So, for the perfect environment, your domain name registrar, your DNS provider, and your web host provider will all be the same. This example uses this best practice case of having all 3 services on one quality host, e.g., Host Armada.
If you have the necessary permissions available to you from your host, you can create an addon domain via cPanel. If unsure, contact your hosting provider to find out how. Also, some hosts will allow you to control multiple domains from a single cPanel account. Here’s an example using the host “Host Armada” who provides all 3 services as an integrated best practice. Also, you will need to already have a purchased domain name.
Moving forward, these steps may be very similar of how to add an addon domain via your own host. So, similarly follow the steps listed in the illustrations below.
Step 1. Login to your host’s dashboard and tap <Domains>. Note that this is not cPanel.
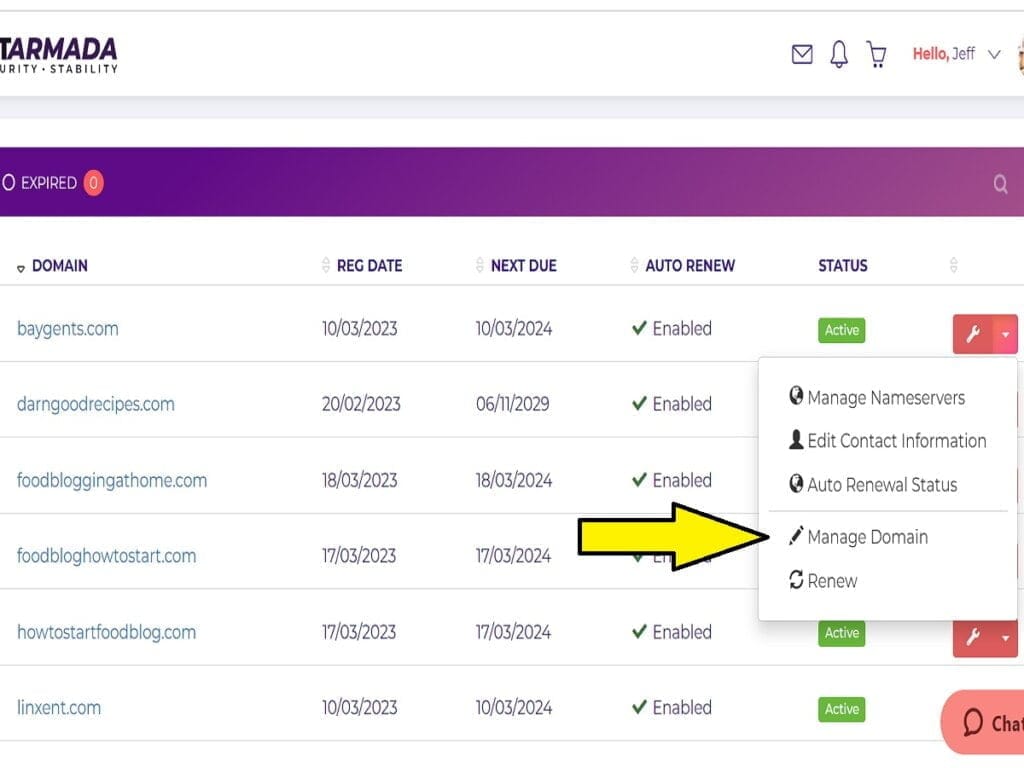
Step 2. Locate the desired domain to add; tap configuration tool and select to manage domain.

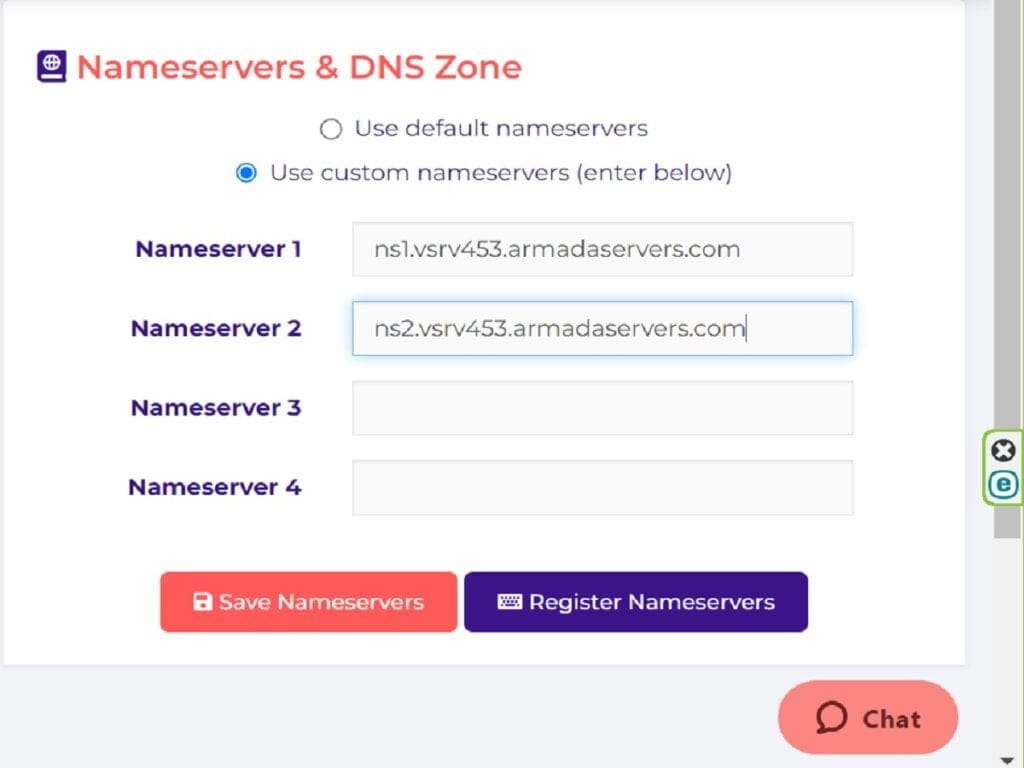
Step 3a. Open NameServers settings at Domain Registrar.
Changing NameServers
The nameservers often get changed at this step, even if domain registrar is the same as the host provider. However, there are some times where they don’t get changed. Regardless, they must be assigned and sometimes it happens by default. However, there are times where the default added by the web host’s system is not correct for the addon domain case.
The nameserver names you want will belong to your host provider that you’ll be using to host this domain. There are cases, however, where you will be using other nameservers. For example, you might have outside services like a CDN provider. For getting started with this addon domain example, don’t consider nameservers at this time. So, continue with the nameservers that apply to your web hosting plan of your primary domain.
Tap to choose the option “use custom nameservers”. Then, replace the names that the host provider wants and tap to <Save Nameservers>. In this case, there is no prompt or confirmation msg.
Some hosts, like Host Armada, use nameservers for just its registrar holding purposes for new domains. Then, you have to reassign different nameservers to match the hosting plan your primary domain uses.
Step 3b. At Domain Registrar, change nameservers to be the desired host provider’s web hosting plan’s nameservers names. This is Host Armada example.
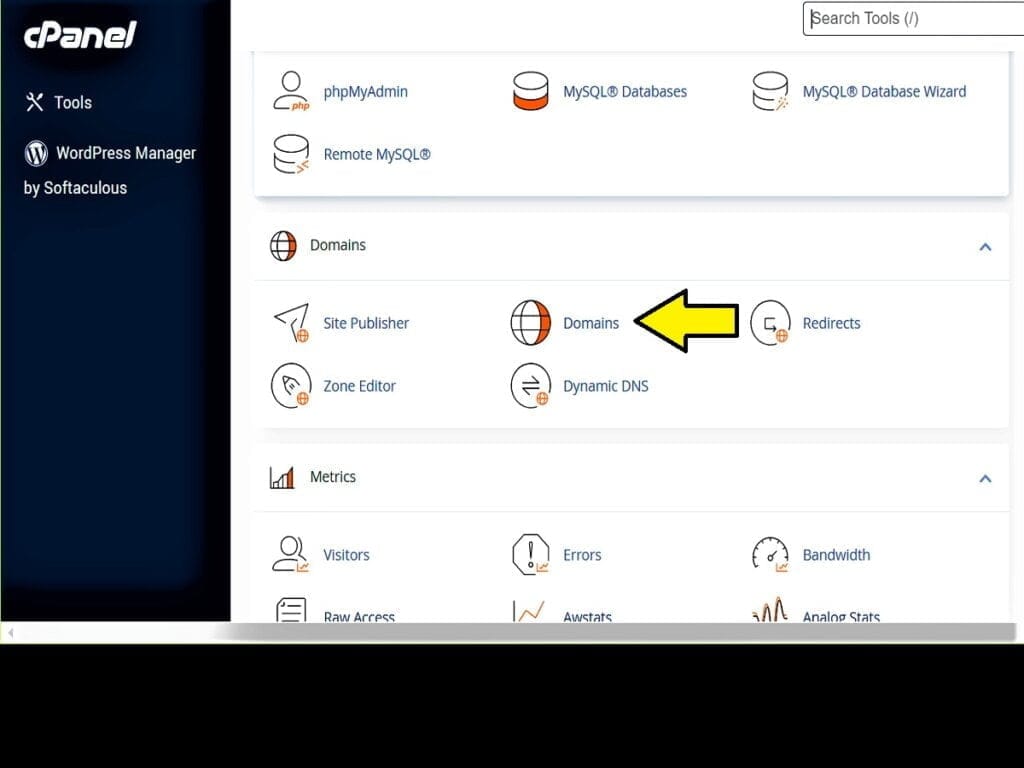
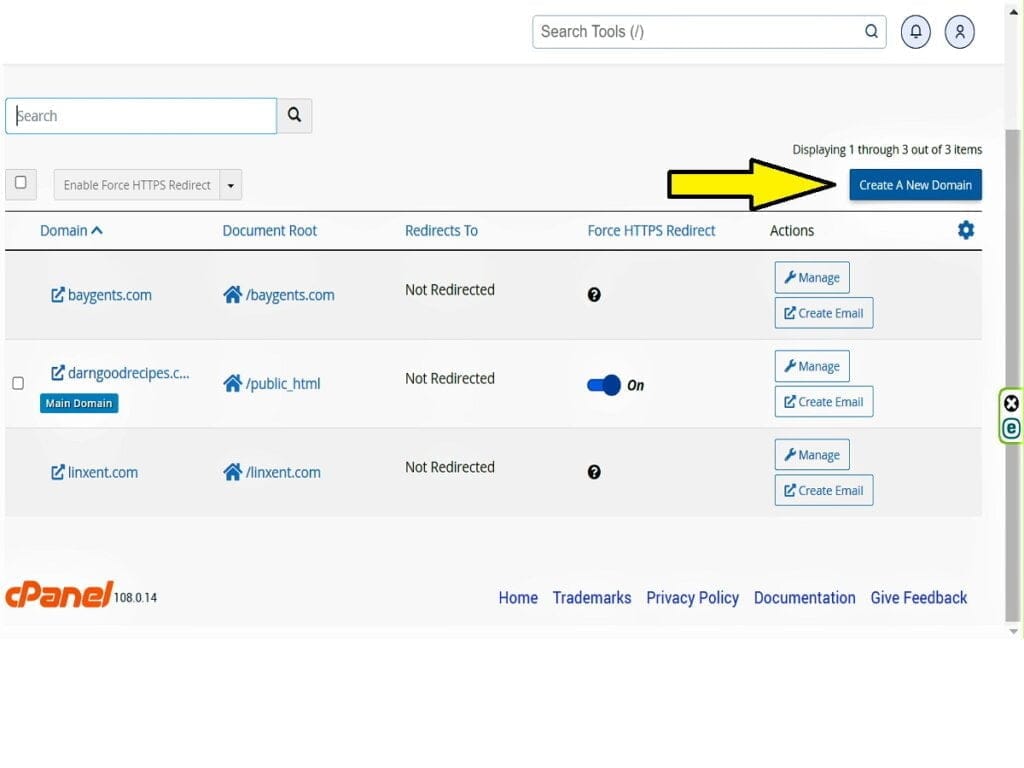
Step 4. Logon to cPanel and tap on “Domains” in domain section.
Step 5. Tap on <Create a New Domain>.
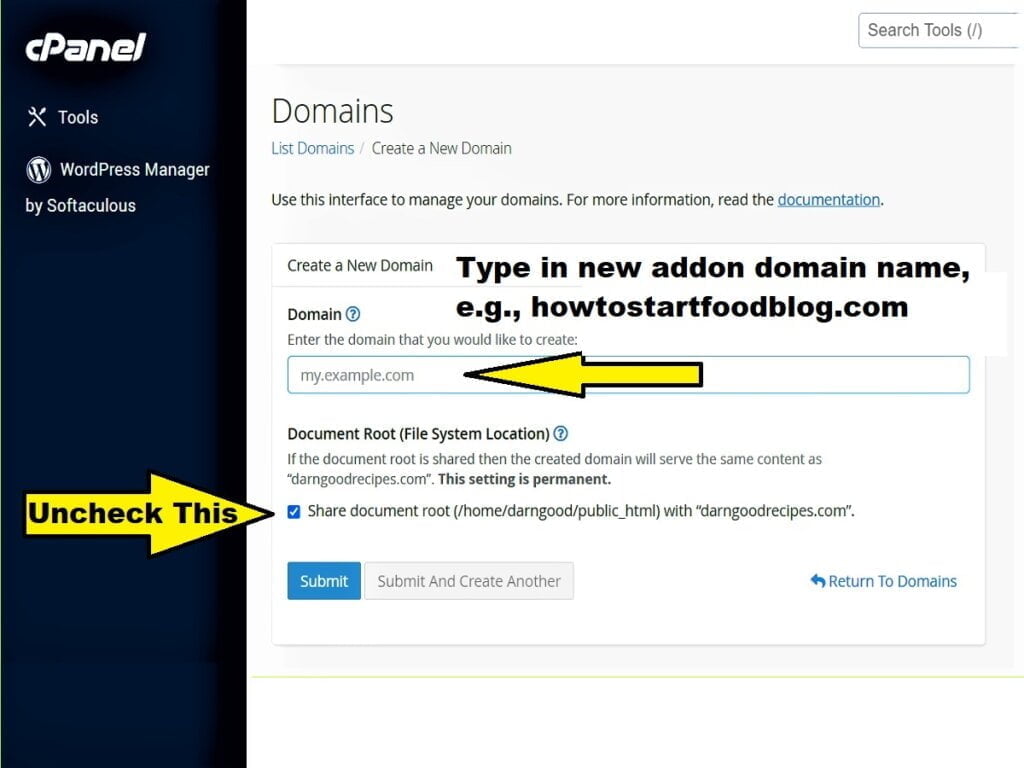
Assigning The Addon Domain Name
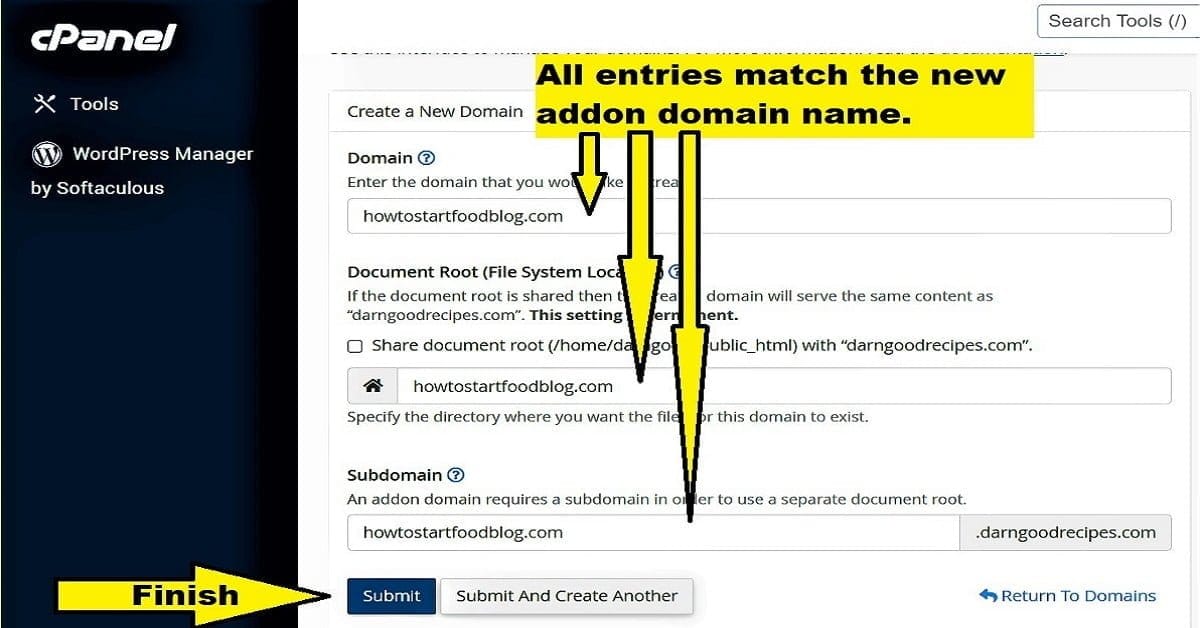
When you uncheck the option of sharing the document root, some new items will appear for entries. Since you don’t want to share that root folder, you must enter in the folder name you want to create as this new domain’s root. So, the best option is to literally retype the domain name, including the dot com or whatever it ends with. It’s important to also use all lower case for future proofing site moves to other servers. That’s because some other servers differentiate settings and don’t recognize case sensitivity differences.
Subdomain Text Entry Requirements For New Addon Domain
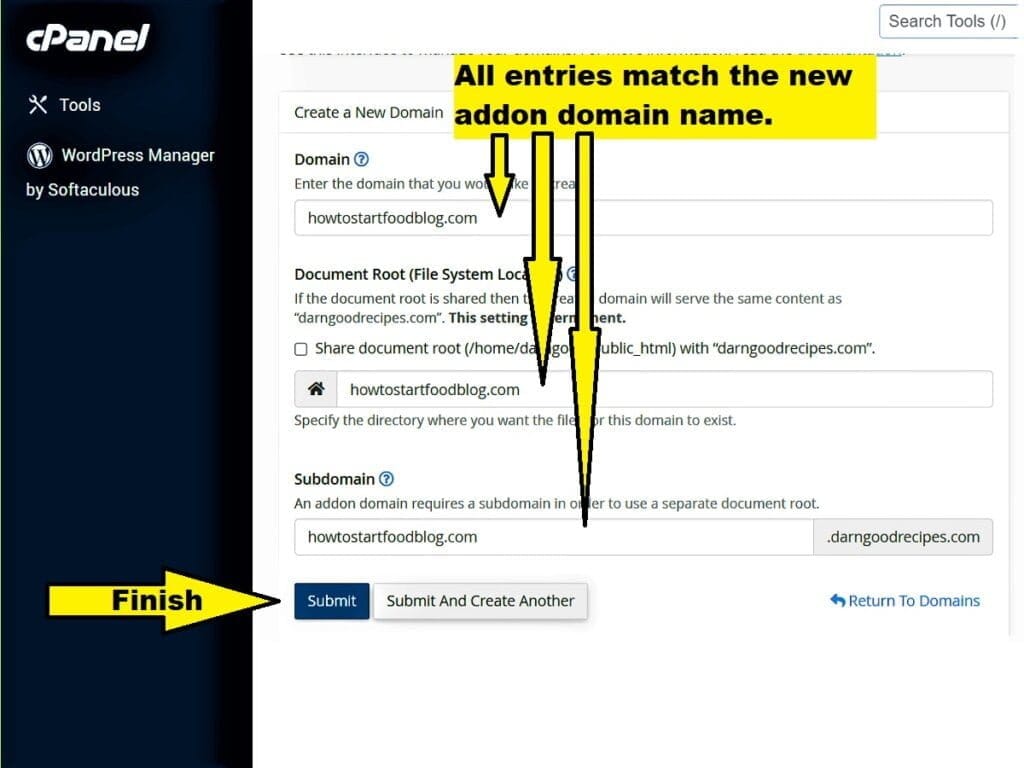
The last item to populate is the “Subdomain”. All addon domains are acting also behind-the-scenes as a subdomain. But, it’s with sizable differences. So, don’t worry; because of all these previous steps, you will still manage it as its own domain. And, it’s still operating as a full Addon Domain. So, in the Subdomain text entry, it’s usually prepopulated already. If it’s incorrect, adjust it to be just the full domain name, e.g., howtostartfoodblog.com. Then, when all 3 entries show the same, tap <Submit>.
Step 6b. Type in the document root to be the new addon domain name. Repeat this on the “Subdomain” entry. Finish by tapping <Submit>.
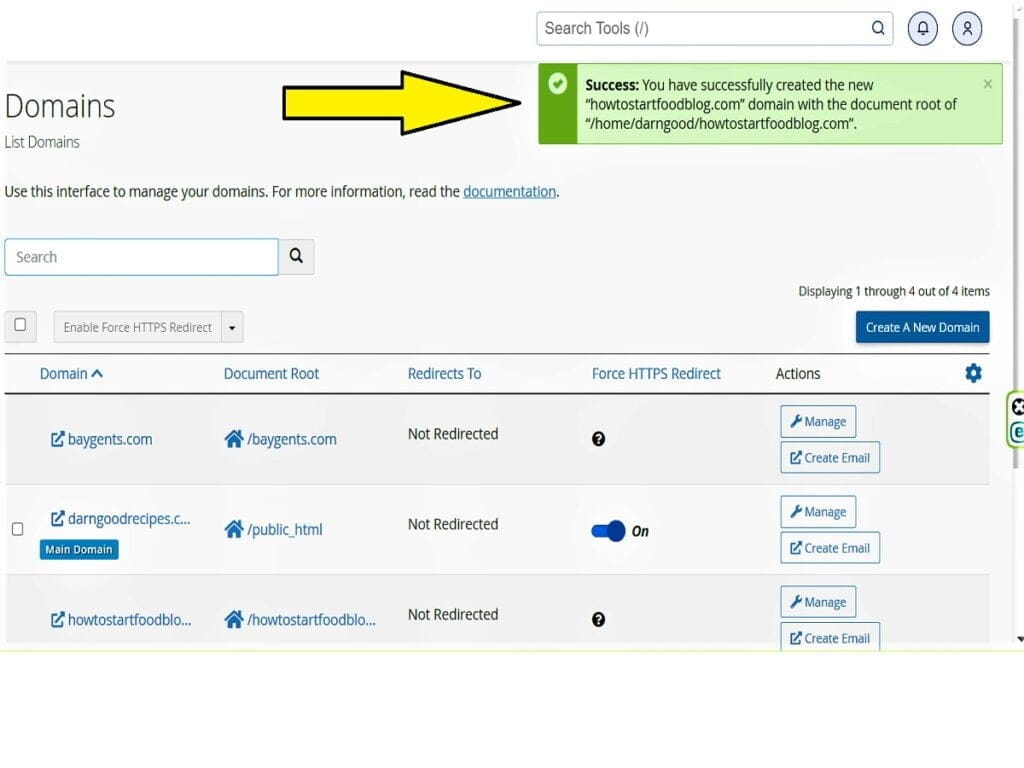
Step 7. Success msg is displayed showing new domain created and its own root folder path.
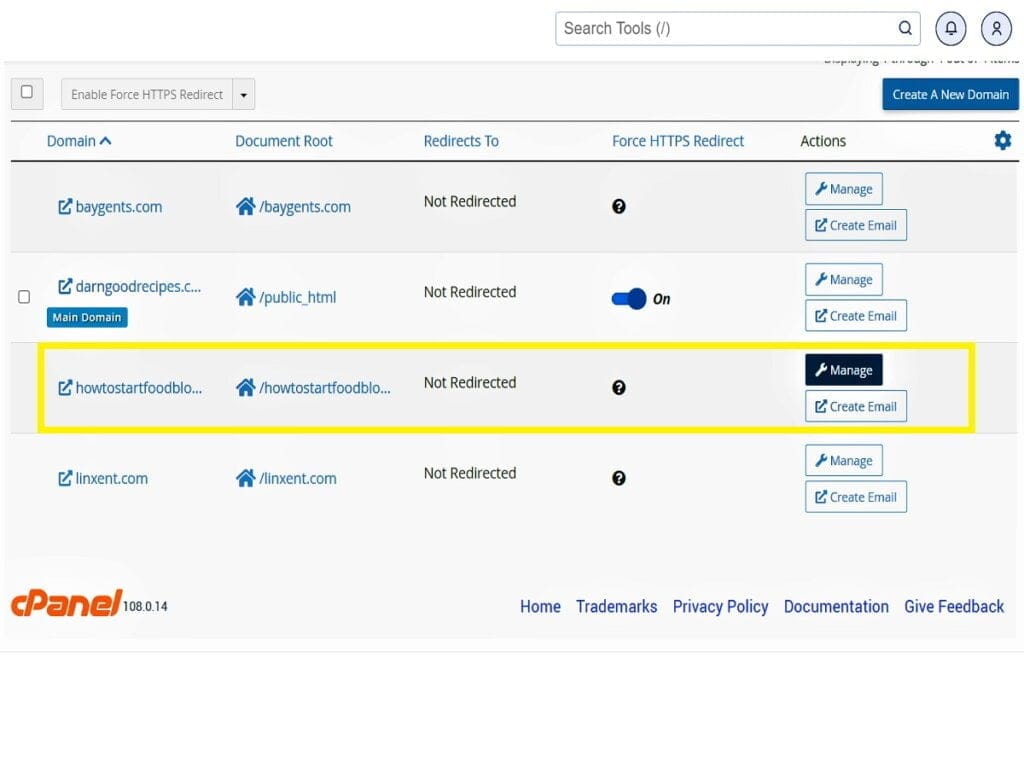
Step 8. Go to Domains list in cPanel. Tap <Manage> under new addon domain to confirm details shown.
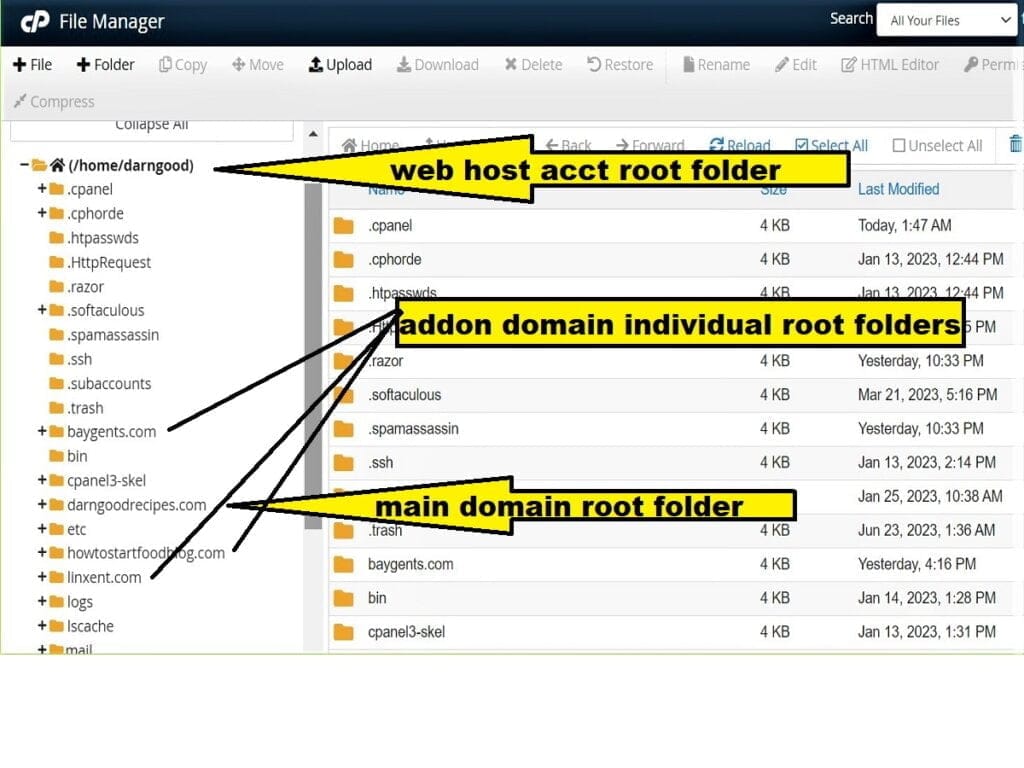
Step 9. Check File Manager via cPanel to confirm individualized root folder with new addon domain name.
Now that you’re done with a new addon domain creation, you can proceed to other desired actions like creating FTP accounts, installing WordPress, and so on.
Do I Add The Addon Domain To The Document Root or To Another Directory?
You can do whatever you prefer but I like for every domain to have their own folder. In the long run, it aids in keeping a more distinct separation of files and permissions. You’ll tend to have less issues regarding permissions, separate backups, etc.
How To Manage an Addon Domain cPanel Account
There can be a reasonable separation level of the addon domain from the primary base domain. This is dependent on the base domain’s cPanel account setup and the hosting plan. It might also be based on your hosting provider itself, as some don’t always a lot of control to perform all these functions. Still others lock you into a single domain for every plan. Another impact can be the DNS setup. It also depends on its initial creation and the setup options selected. From the cPanel screen, tap <Domains>, see your list of multiple domains from a single screen, and select <Manage> to view that addon’s options.
HostArmada is a host provider that permits multiple addon domains for a single plan. And, you have DNS access. Also, https certificates are self-assigned automatically (later discussed). Here’s an article by HostArmada on “How to Manage Addon Domains in cPanel“.
How to Access Addon Domain cPanel Accounts
You can access your addon domain cPanel accounts by first logging into cPanel. Then, tap on <Domains> from the main screen after logging in. You’ll see the leading Domain identified and then the others are going to be any subdomains and addon domains. Each domain type will have a very small set of options and you’ll mainly use its own <Manage> button.
You’ll usually visit your host’s account login and manage all your domains initially from there. That’s also where you’ll see an option for any addon domain cPanel items to either share cPanel or to have their own cPanel login.
Addon Domain cPanel to Force https
This is a good option to select in your process of settings for a new main addon domain cPanel account and its site. If you have issues, you can always access this setting and disable it. You’ll need to review your host on how to create the HTTPS certificate for your site. Many have a set of steps to follow. Some will do this automatically behind the scenes for you, like Host Armada. Usually, within a minute or two, you’ll be able to access your new blank home page and it will be via HTTPS. Be aware that the forcing of HTTPS is based on the original key domain.

Observe that this option is one of the shared requirements of subdomains and addon domains. So, all subs and addons will default to whatever the first key domain was setup with.
Create an FTP Account for New Addon Domain cPanel Account
After you’ve setup a new addon domain cPanel item, go ahead and create an associated FTP account for it. This is also done via cPanel.
How To Add A Website For A New Addon Domain cPanel Account
After you’ve created your addon domain cPanel item, you can now prepare to install WordPress onto it. This will begin to give you a starter website with one page on it. At least you’ll see a default simple page so you’ll see something to confirm your new addon domain is really working.
Important: Ensure you read all of this section as it covers important WordPress notes (and a link to installation settings) for the first time.
This is initiated by logging into cPanel, scrolling to the bottom, and looking for the apps that are available to install. Usually, this section is named like “Softaculous”, which is a standard service that most web hosting services subscribe to.

There you’ll see a list of several apps that can be installed. I recommend avoiding all the others until you’ve installed WordPress and have it established. So, tap on the <WordPress> icon and follow the prompts. One of those prompts will give you a list of domains. From there, you’ll select your new domain. However, before you truly jump into this, read our very important article on “How To Install WordPress“. There are some long-term settings that are highly recommended for future proofing your install. It also will prevent issues might regret if you missed them.
How to Remove an Addon Domain
This is how to remove an addon domain. It’s extremely simple and, because of that, it’s always recommended you create a backup of your primary domain and any other addon domains before deleting. Here are the steps in order.
- Prepare by backing up any files and images of the domain about to be removed.
- Backup the primary main domain, including all addon domains. This can be deleted later to save space.
- Logon to cPanel of the host’s primary domain.
- Locate the addon domain you want to remove and click on its associated <Manage> button.
- When the manage screen of the domain appears, review all aspects to confirm this is the correct one to remove. Then, press the <Remove Domain> button and respond to any subsequent prompts, if any. Here are visuals of these deletion steps.


Conclusion
Now you’ve seen how to create an addon domain, as well as to delete, and manage one. With these abilities, you’re on track to managing more sites and saving operating costs along the way. Why don’t you test it out.